Back
Back
06 | BIM User
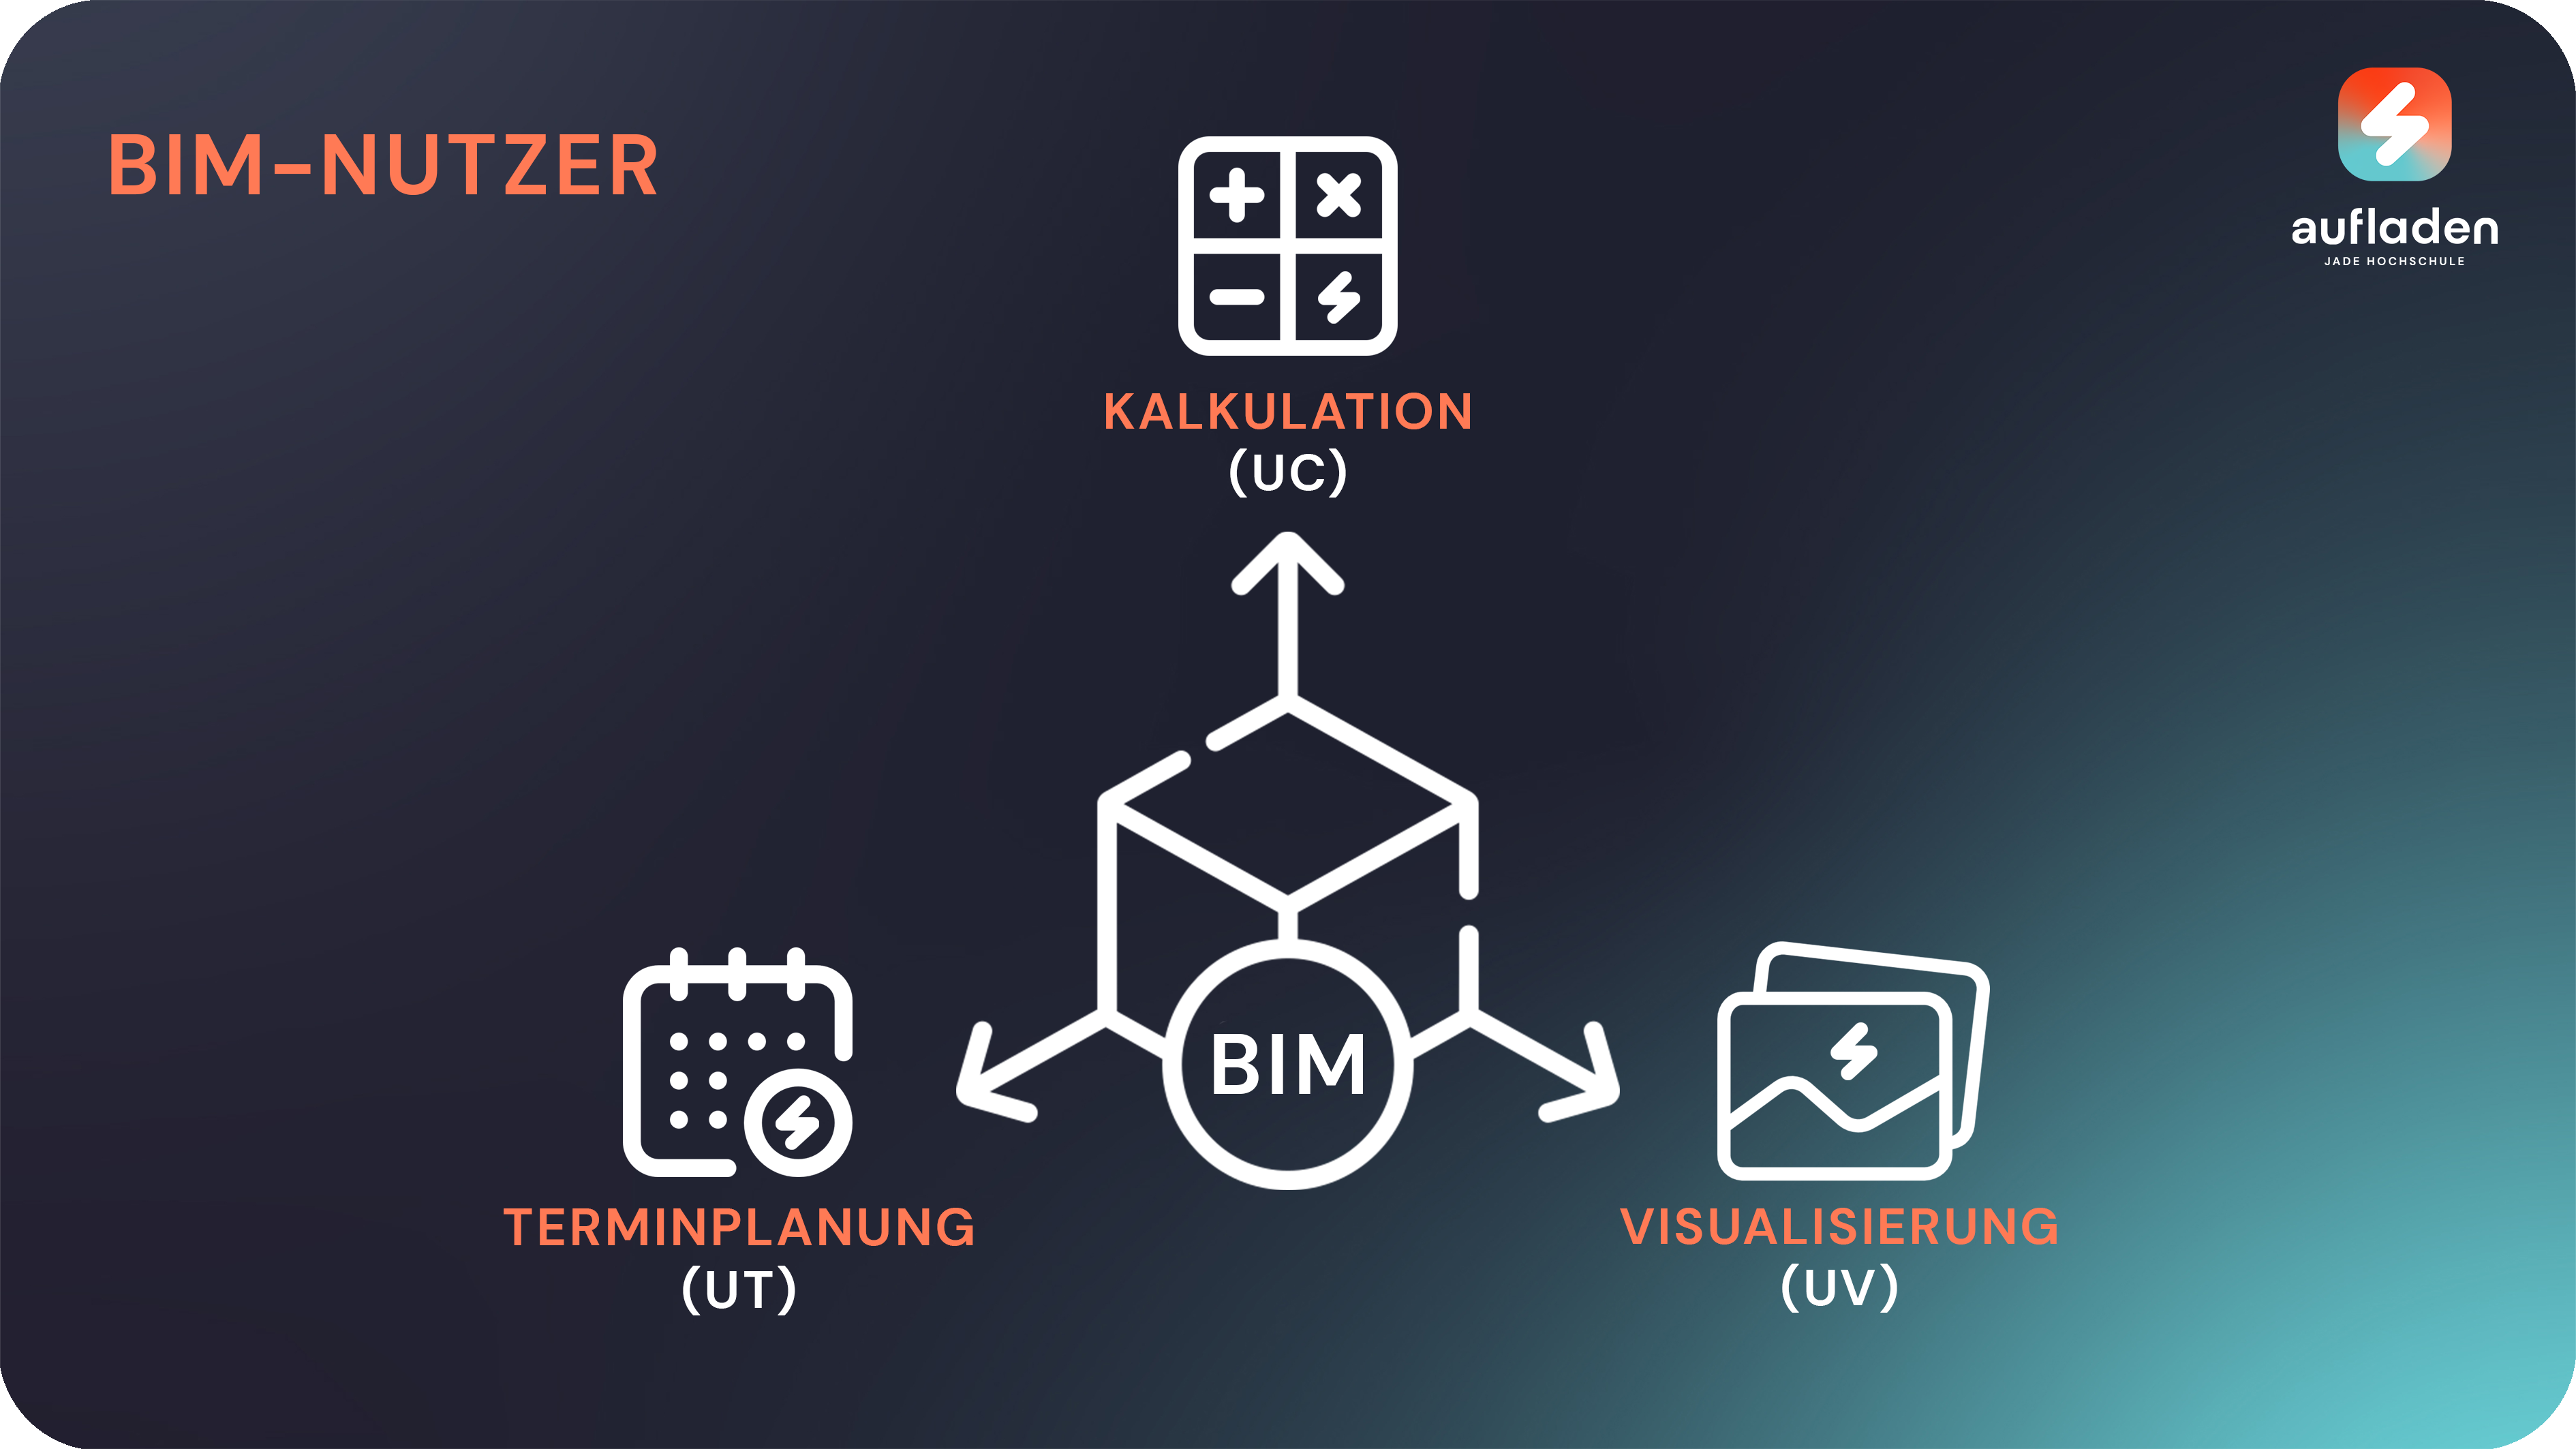
“BIM User” is about the active use of BIM. Depending on the project and application, the tasks in the construction project vary.
module construction
In the last course module before the BIM Game, as a BIM user, you will dive into various subject disciplines, such as the calculator (UC — User Calculator), the appointment planner (US — User Schedulelator) and the visualizer (UV — User Visualizer). Diving into various areas should illustrate which information can be drawn from a BIM model and processed further.
Role description
The BIM user only participates in the BIM process by using the information from the BIM model without changing it. For him, the main purpose of the model is to obtain information. Most of the time, BIM users are experts, such as architects, construction managers or facility managers. Depending on the use case in the BIM process, they use different BIM technologies to plan, design, create or manage projects.
Content of the module
Objectives of the module
- Understanding of various disciplines in the IMBIM process: calculation (UC), scheduling (US) and visualization (UV).
- Ability to integrate BIM models into advanced BIM technologies by exporting as an IFC file and importing them into appropriate software solutions.
- Deepening the understanding of the purpose and use of BIM models from a BIM user's perspective.
- Learn how to use specific BIM technologies in various use cases.
- Development of a holistic understanding of the use of BIM models through practical application.
- Fostering interdisciplinary collaboration and understanding of the diversity and qualities of a BIM model.
Calculation in architecture
The cost planner, also as User Calculator [UC] , is responsible for using the BIM model to carry out a model-based calculation of the building.
Using various software solutions, the model is sampled and LV is derived from it.
The area of calculation is an important discipline in the BIM process, which is responsible for determining the costs of the construction project. By implementing the calculation process in the BIM methodology, this process can run faster and with fewer sources of error.
task
Using the previously created 3D model (TUE-06), the model should be sampled and an LV created from it.
- Installing the software that is to be used.
- Sampling the model
- Transfer of data to the LV
- Exporting the LVs
nuggets
These nuggets are important for the [UC] module:
softwares
For implementation, the programs will DBD BIM and Nova AVA used. They usually come with a fee but offer free trials. The university also provides licenses for the software. To receive the licenses, you can send us an email to: projekt-aufladen@jade-hs.de contact
License & Installing DBD BIM
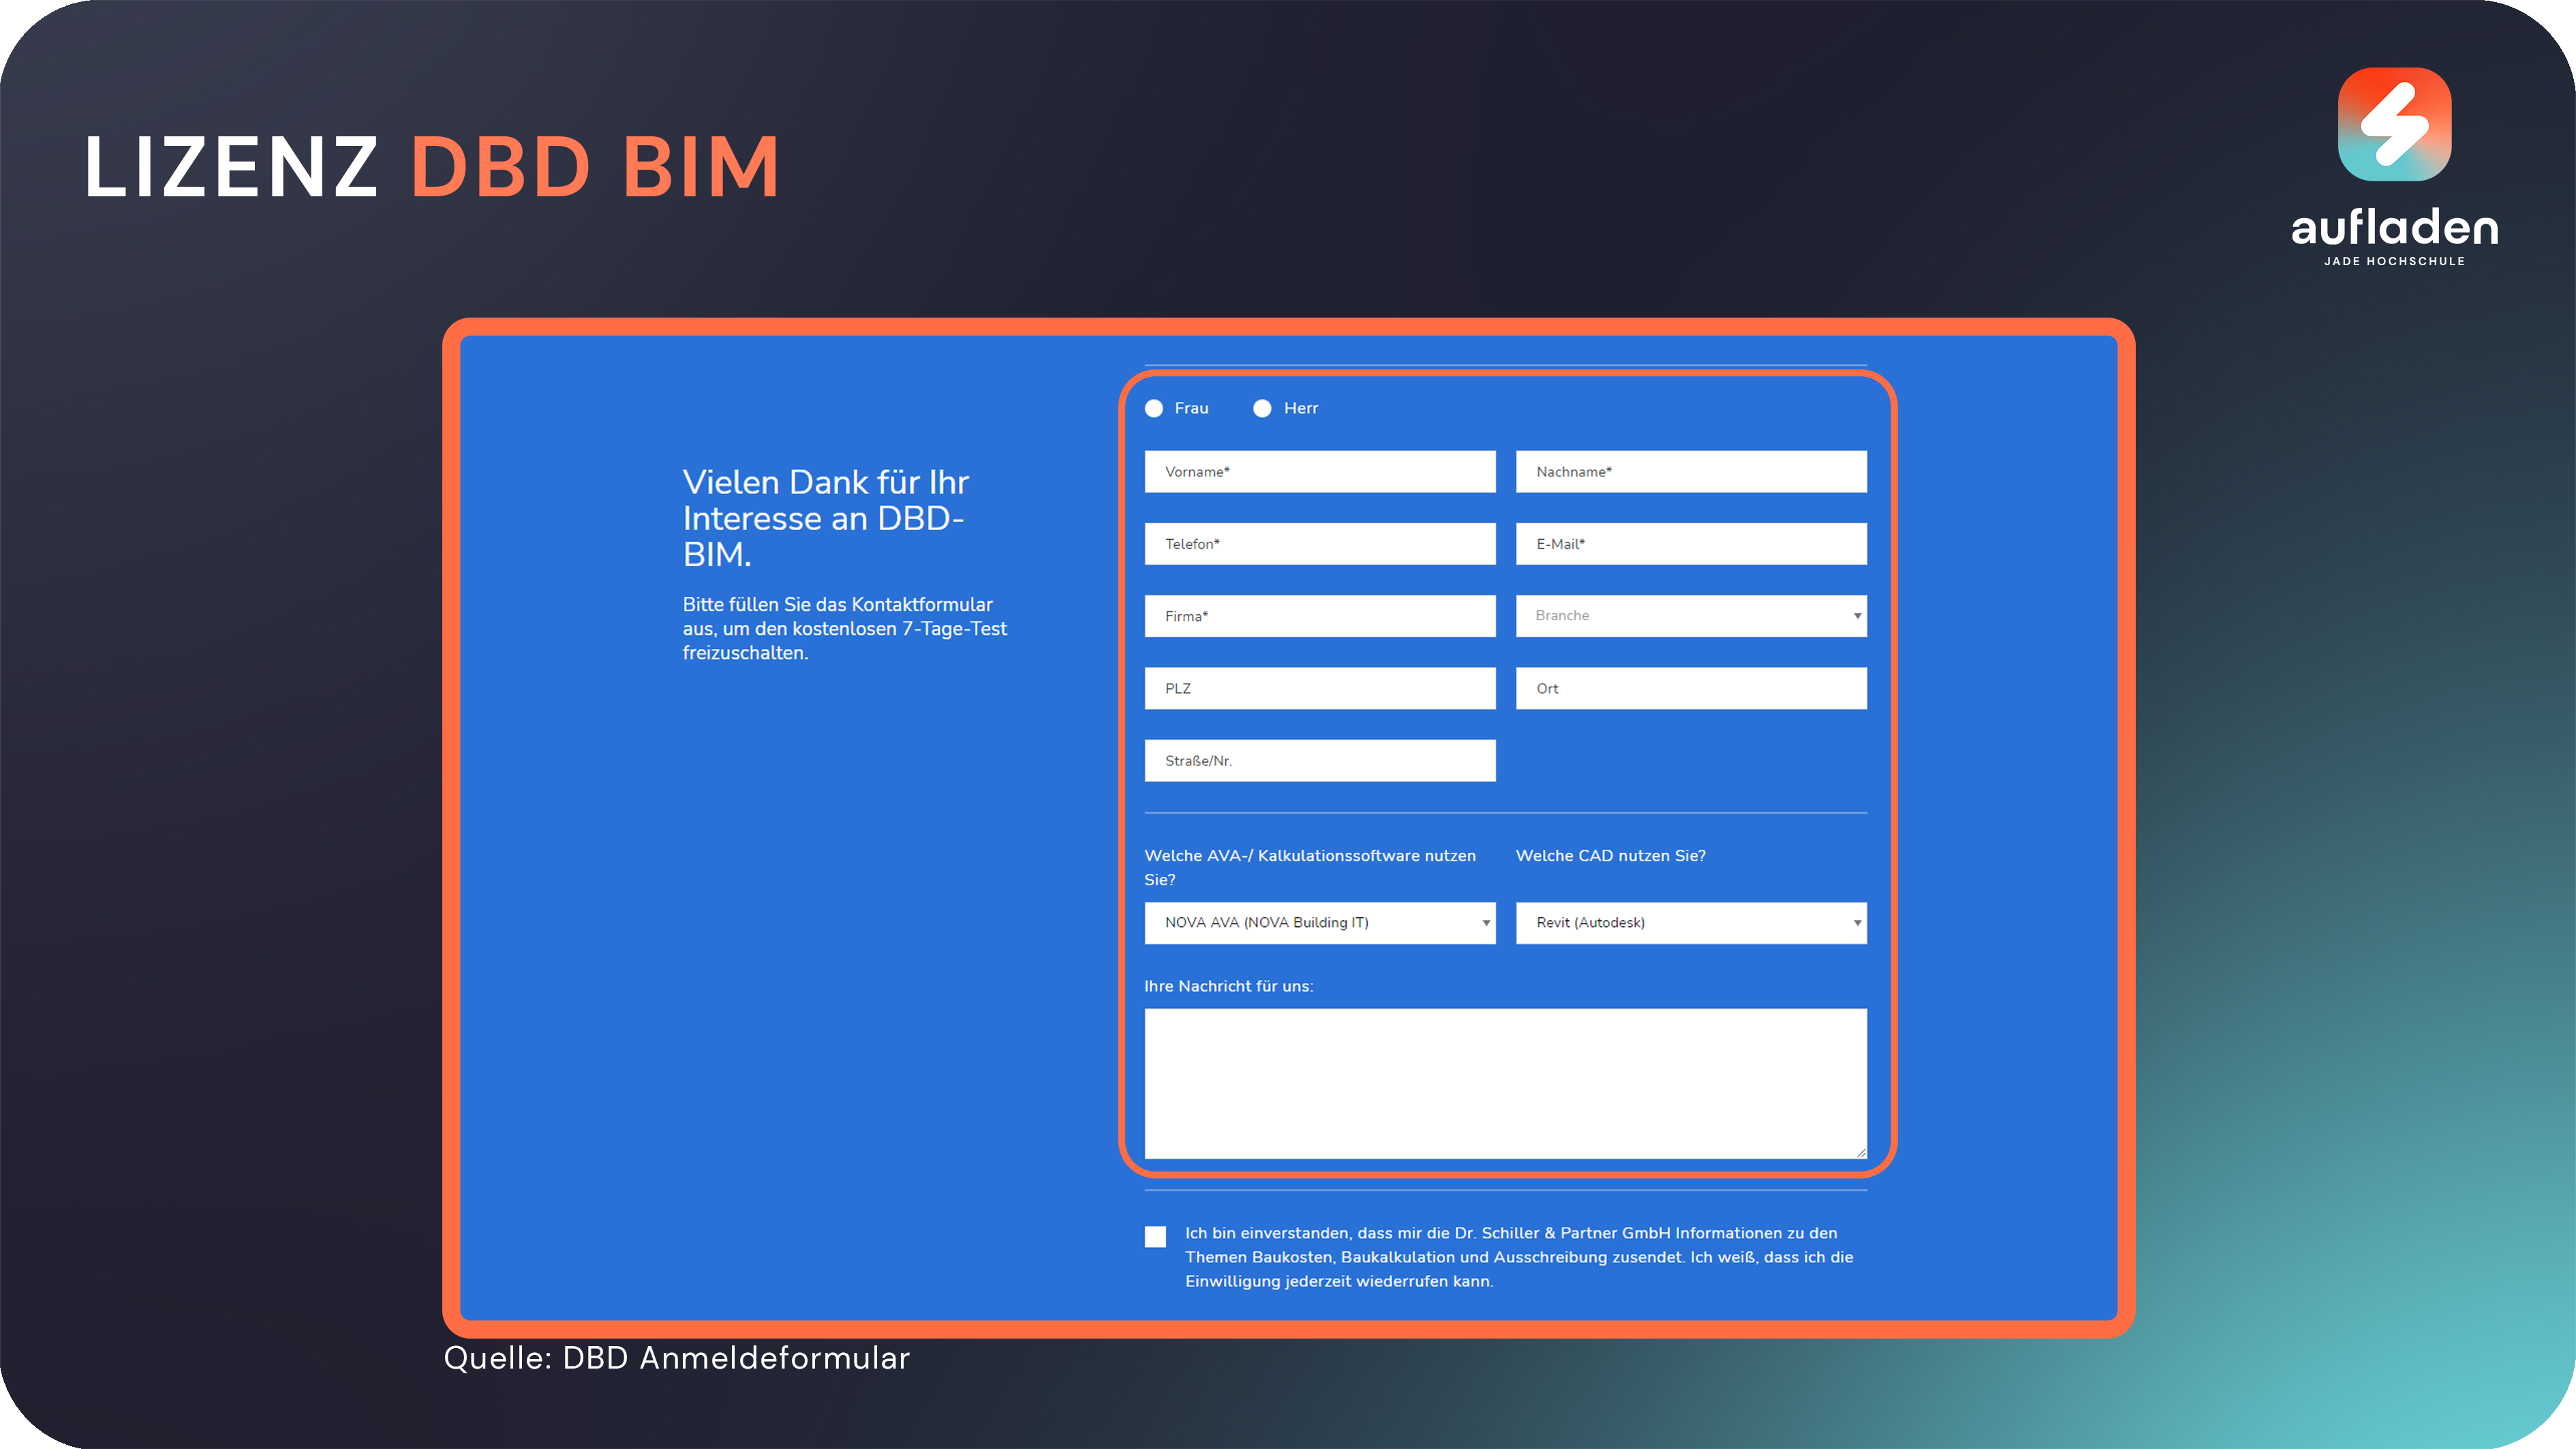
A license is required to use DBD BIM.
A trial license valid for 7 days can be requested via the following link: DBD BIM test license
For an educational license, contact us at: projekt.aufladen@jade-hs.de
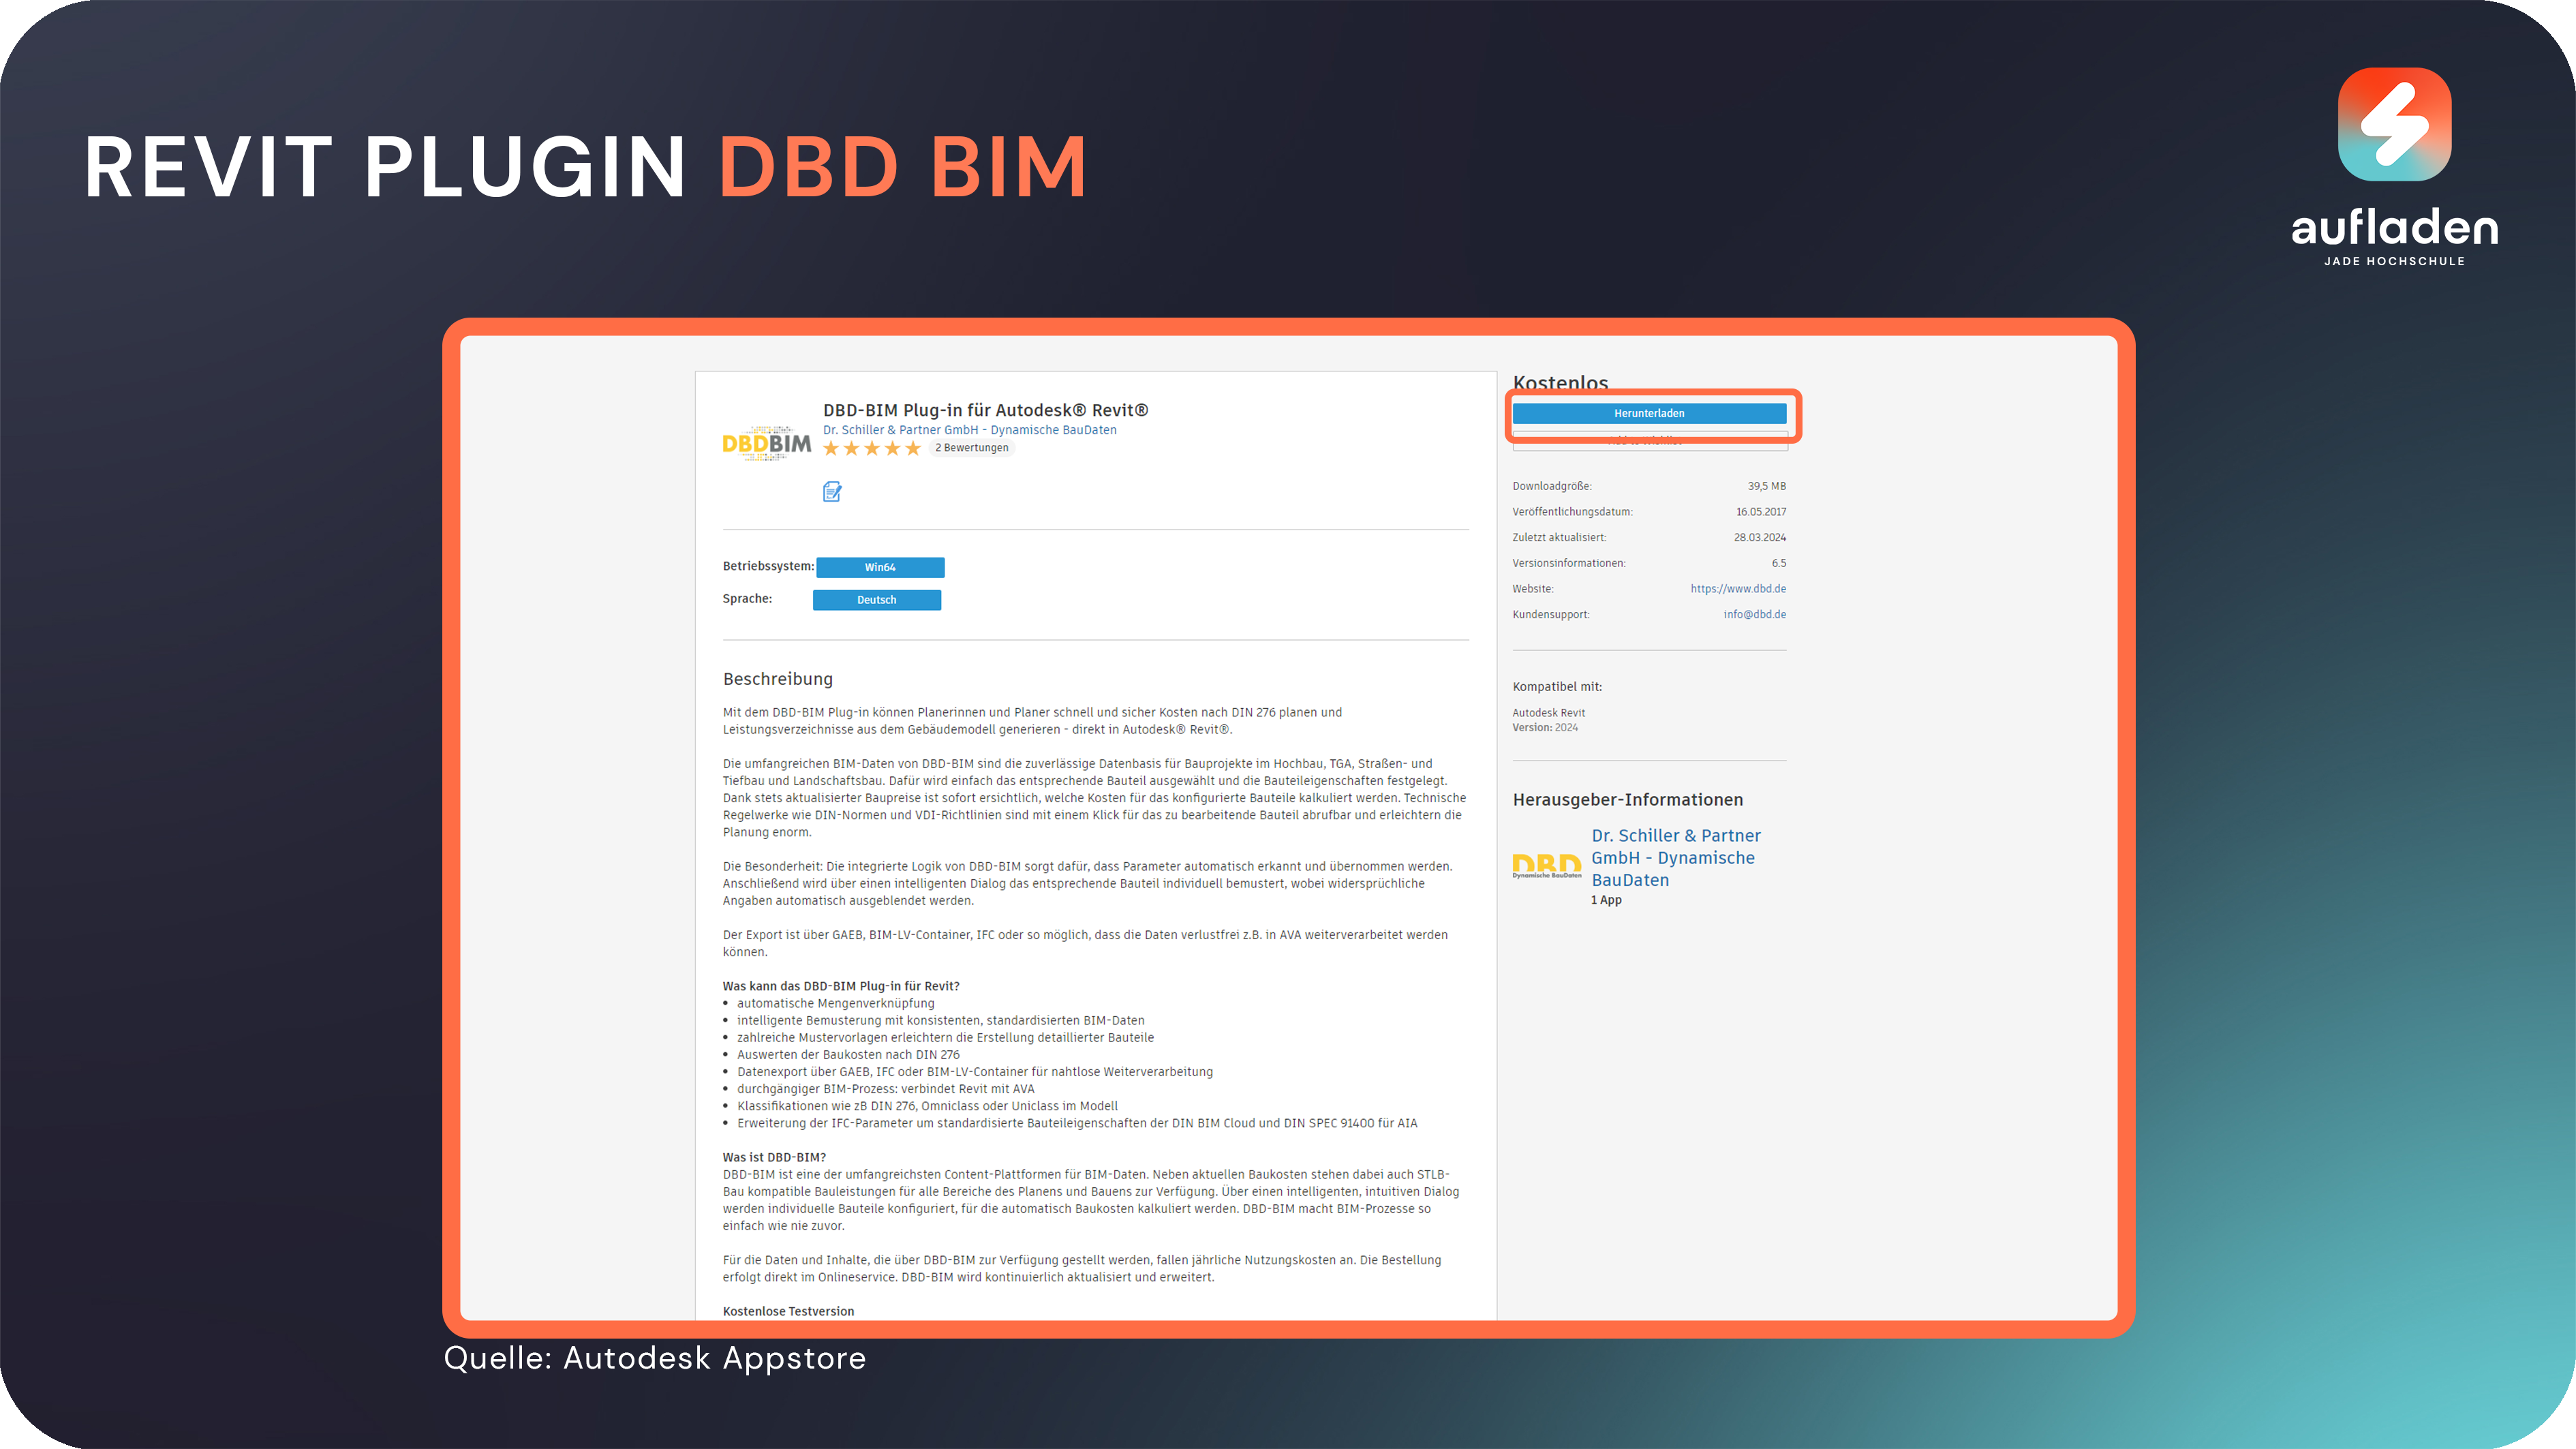
To install the plugin for Revit, follow this link and sign in with your Autodesk account. DBD BIM plugin for Revit
The plugin under this link is for Revit version 2024!
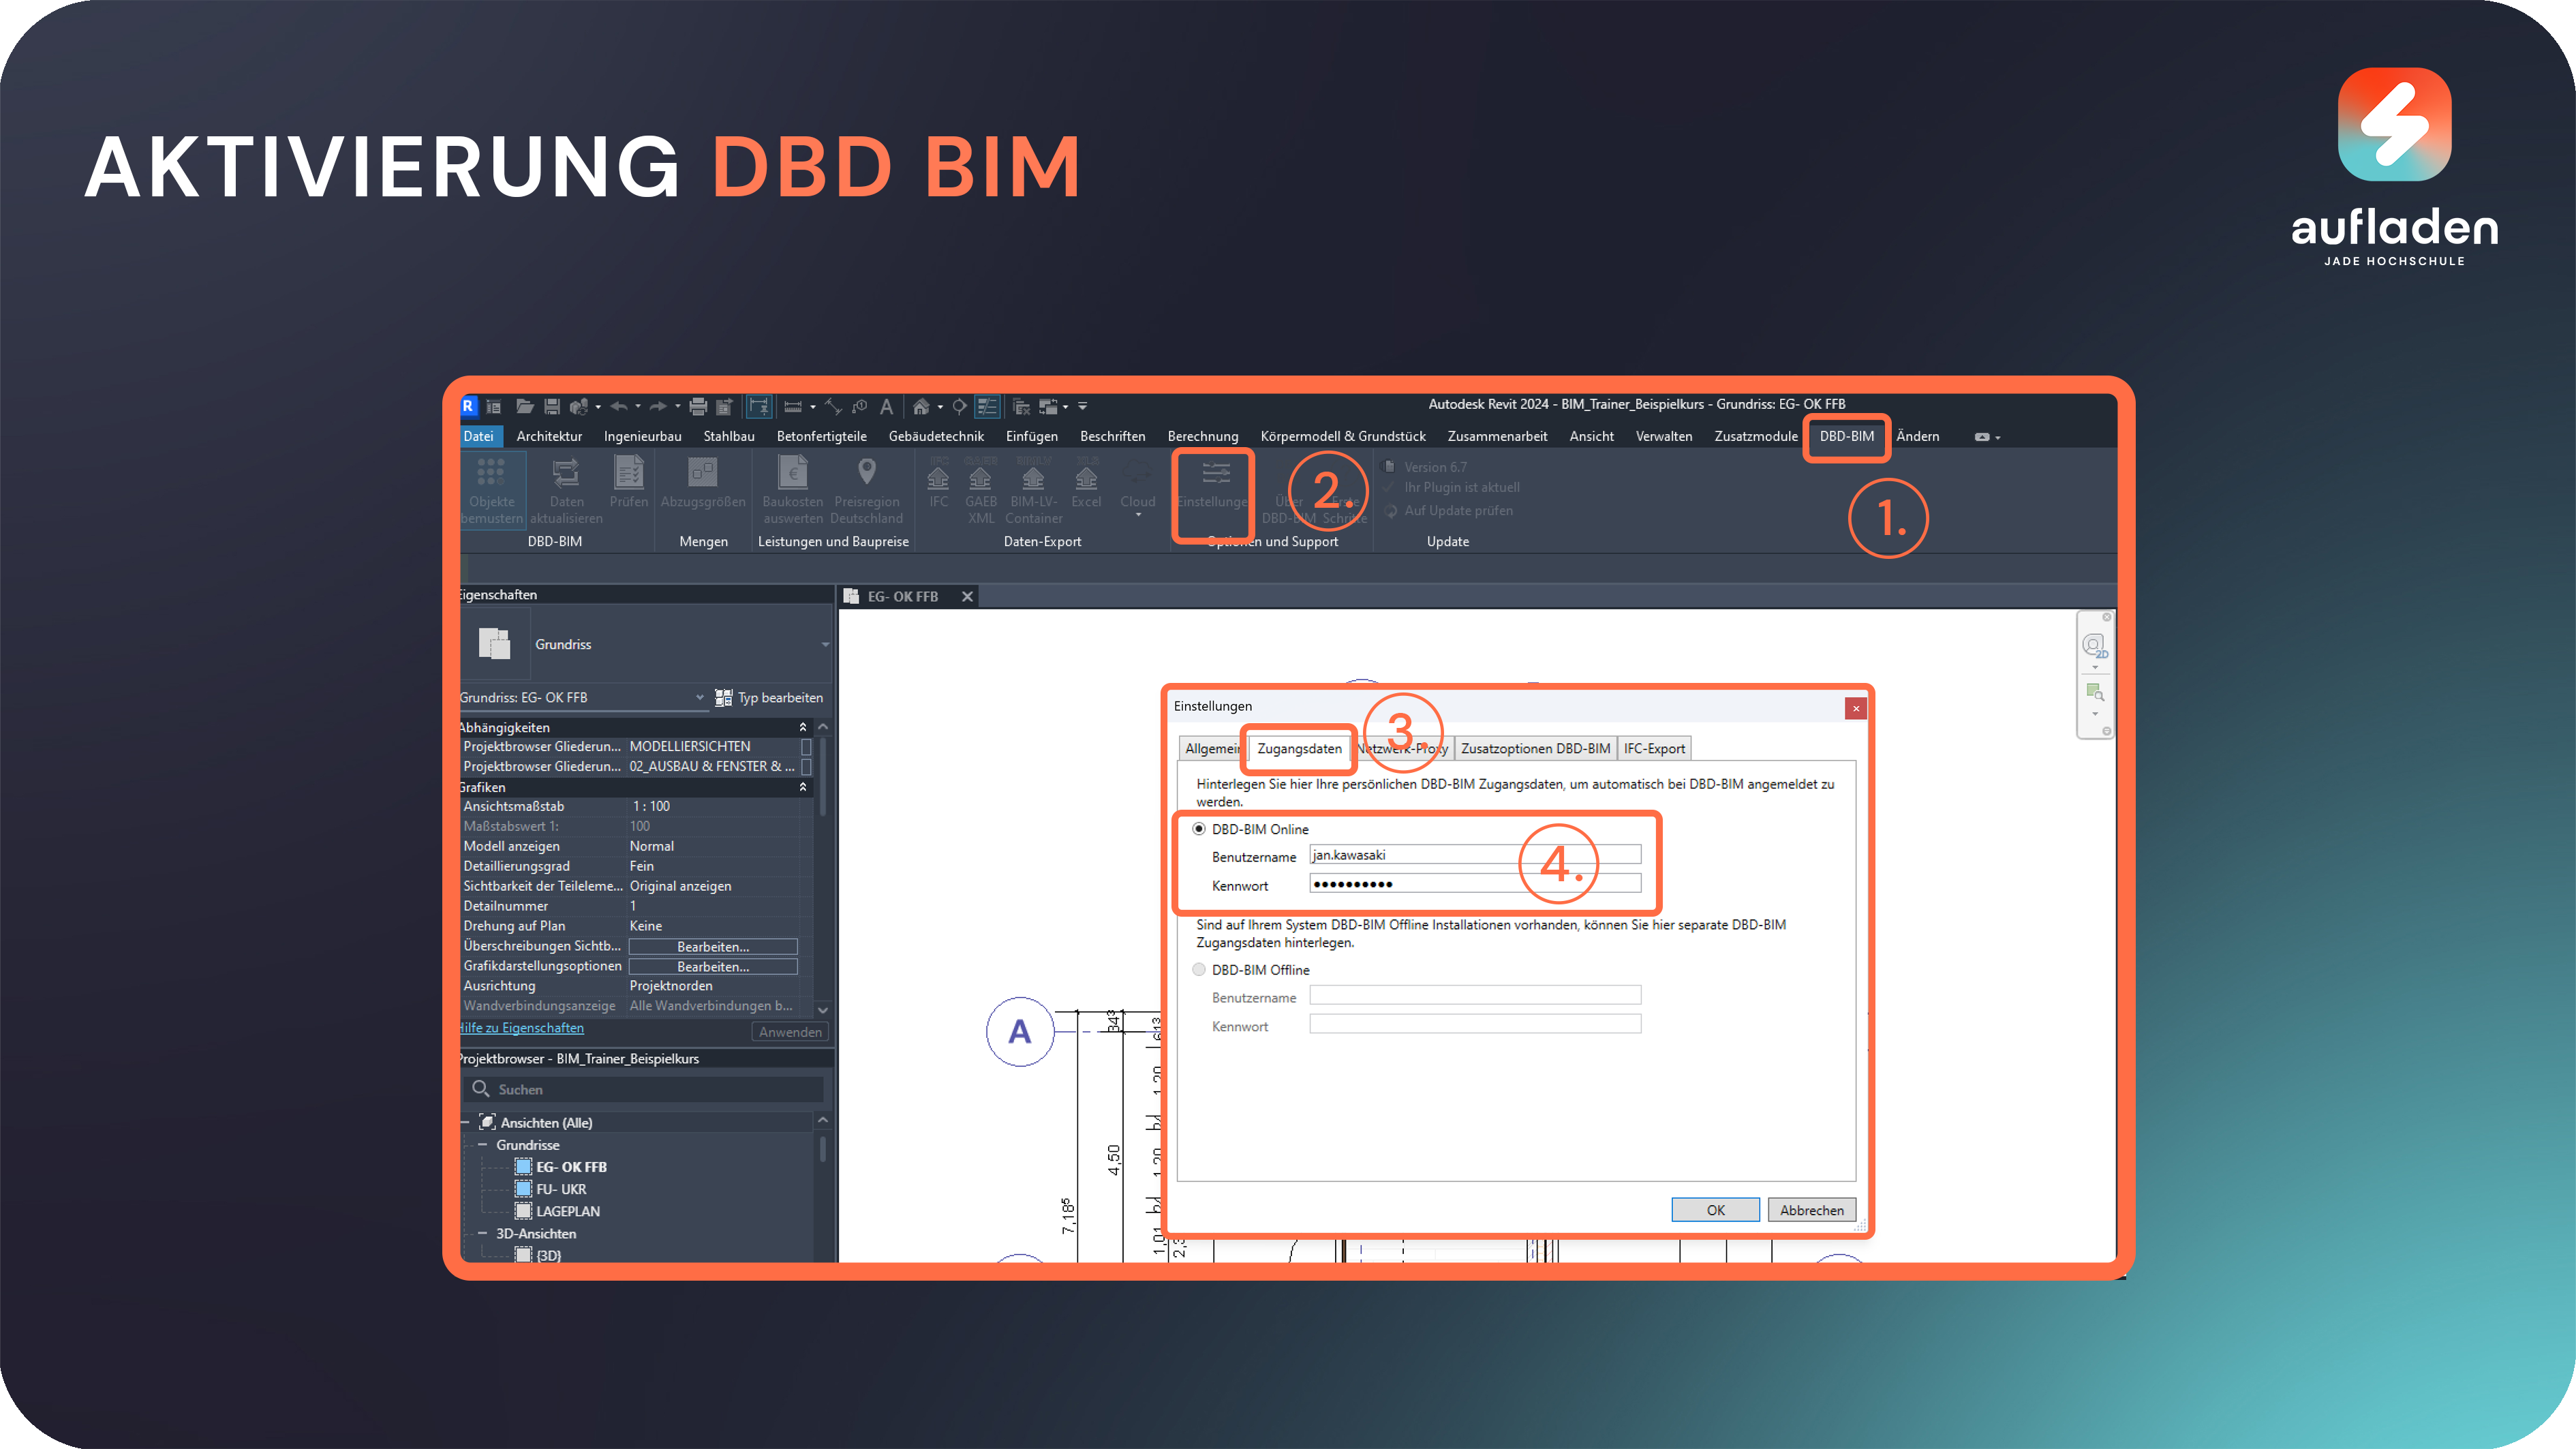
To connect the DBD BIM account with the plugin in Revit, you must follow these steps:
- Open the DBD BIM tab in Revit
- From there, click on Settings
- In the Settings window, click Login Information
- Enter your login details under DBD-BIM Online
- The plugin may need to be updated and Revit restarted
License & Installing Nova AVA
A license is required to use Nova AVA.
A test license valid for 14 days can be requested via the following link: Nova AVA test license
For an educational license, contact us at: projekt.aufladen@jade-hs.de

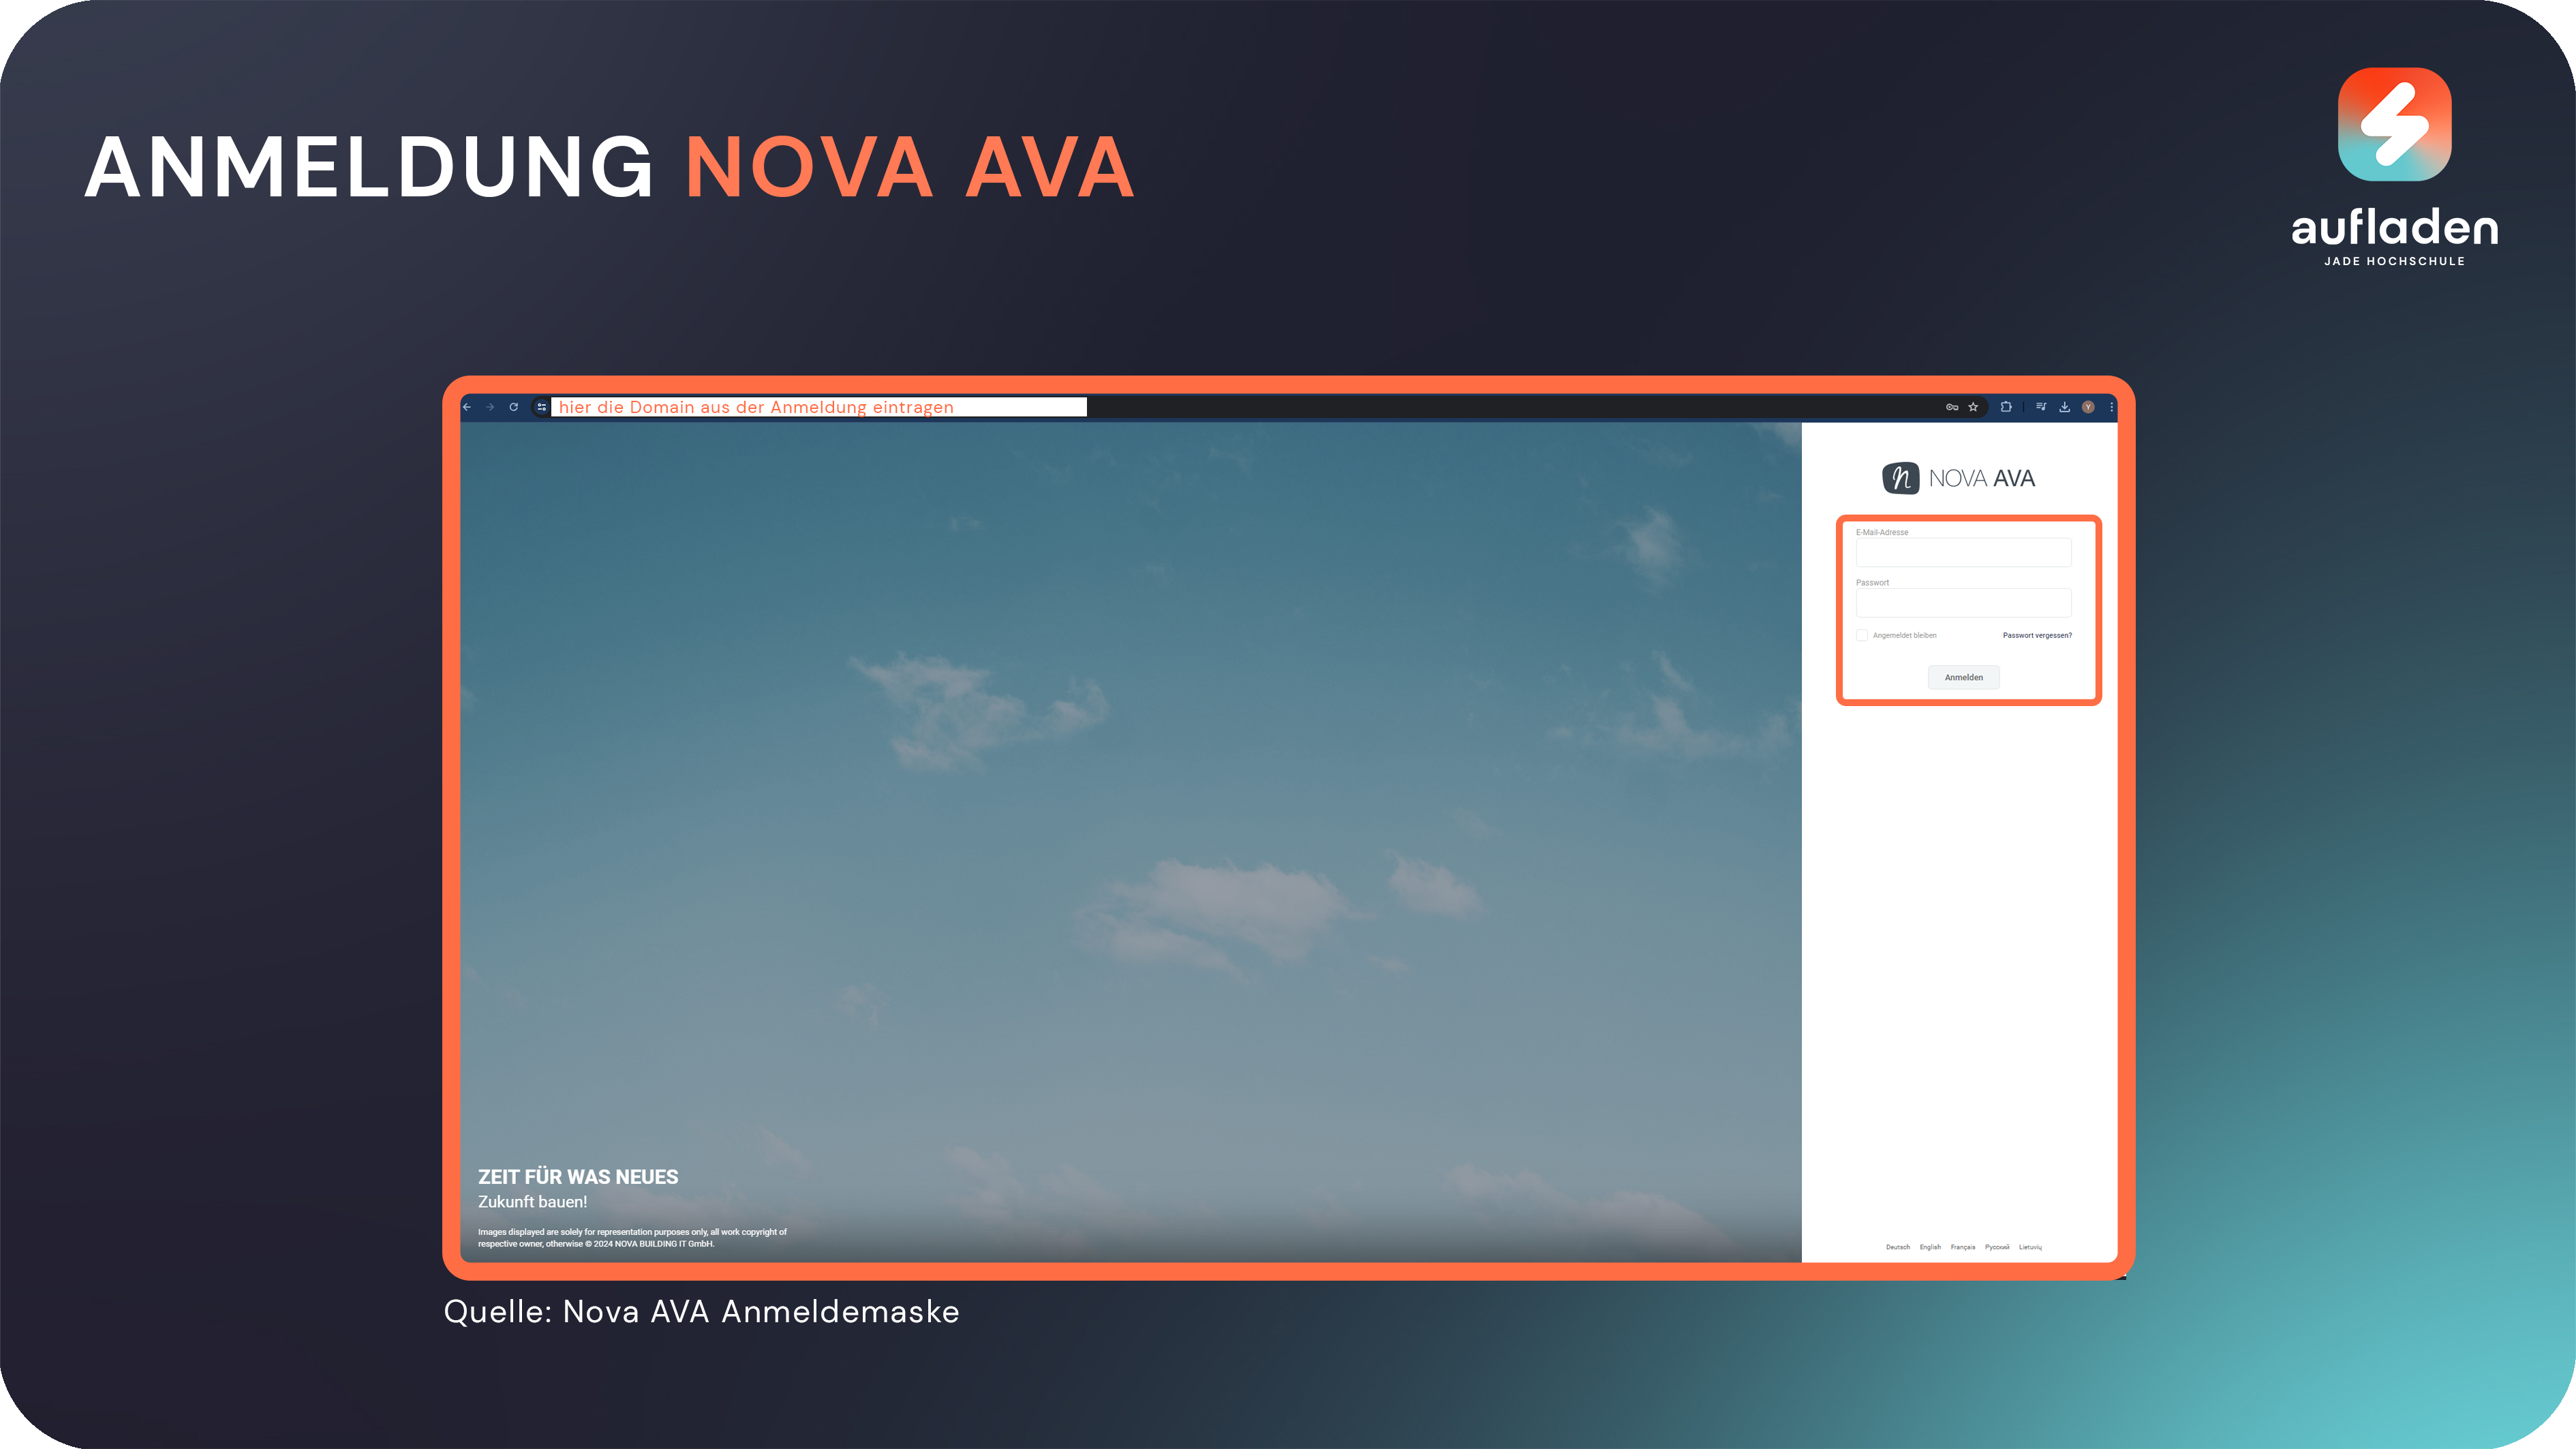
It is not necessary to install Nova AVA as the software is browser-based.
Sampling
Once you have installed the software, you can use the DBD BIM plugin to sample the building model directly in the authoring software (here Revit). By sampling, you deposit in the components what costs they cause, for example in terms of material and labor. The videos in this module can also be found under the DBD BIM nugget.
In this case, you can choose the sampling data yourself. The focus in this module is on the calculation process and does not make any demands on the accuracy of the content.
Export
Once the sampling of the components is complete, the file can be exported. In this case, you can export the file as a GAEB file so that you can continue using it in the AVA software in the next step. ATTENTION! This is not shown explicitly in the tutorial
Transfer sampling to AVA software
In the next step, you can read the GAEB file into Nova AVA and create an LV there.
ATTENTION! This step is only possible and necessary with access to the CDE. You can get access on request from the CHARGING team.
Scheduling in architecture
A BIM scheduling user uses Building Information Modeling (BIM) software to create and manage construction schedules. They integrate schedules directly into the 3D model, enable collaborative planning, and create 4D simulations to visualize construction progress. These methods identify conflicts at an early stage, optimize resources and improve the efficiency of project implementation.
task
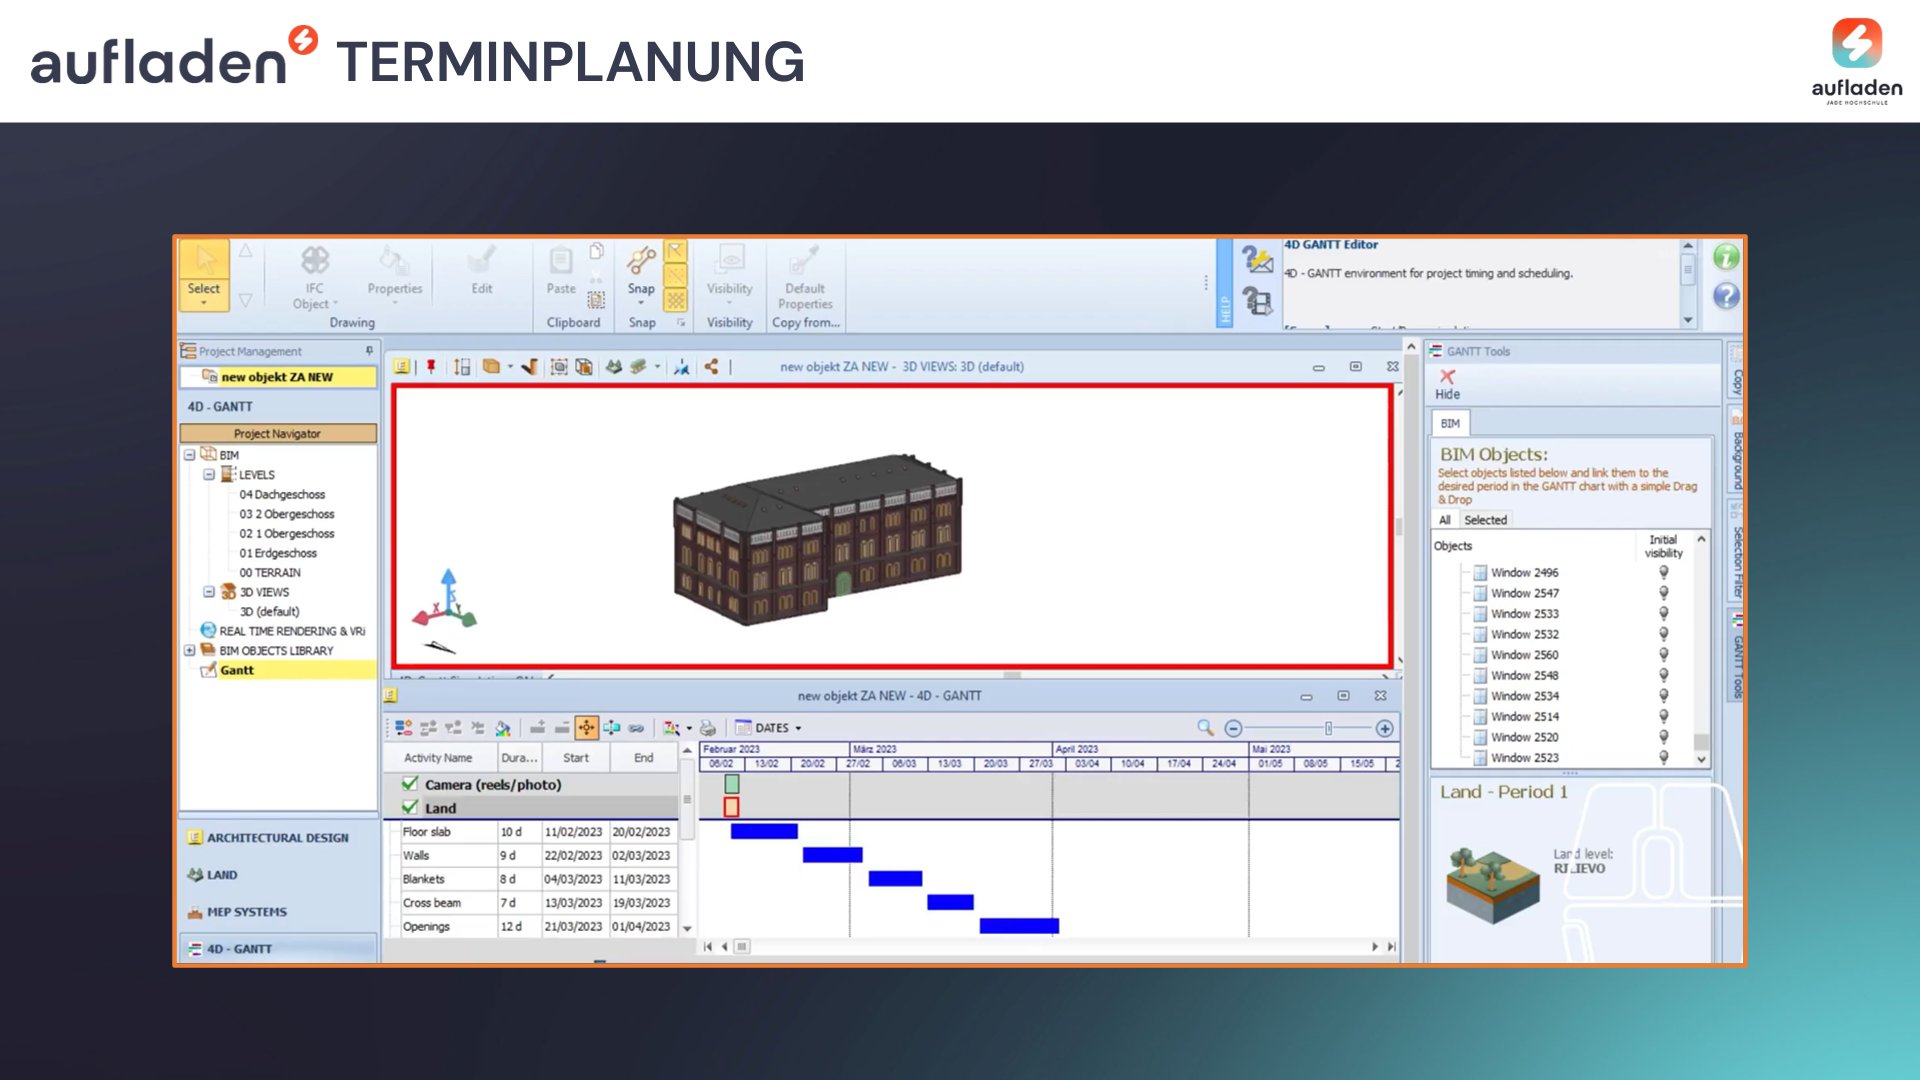
The goal is to create a schedule using the IFC file sample-model.ifc in the Edificius software. The simulation is intended to visualize the chronological sequence of construction activities based on the existing components.
Specifically, the task includes the following steps:
- Read IFC file
- Create a schedule: Assign realistic time frames to the work packages, taking into account their complexity, available resources and possible dependencies between tasks.
- Schedule creation: Use Edificius features to create a visualized schedule. Use appropriate tools and diagrams to represent the timeline of the work packages and their relationships.
- Validation and optimization: Check the created schedule for plausibility and accuracy. If necessary, optimize it to ensure that the project timeline is realistic and feasible.
- Documentation: Document the created schedule and the steps taken to create it.
Documents provided:
- IFC file (this can also be reused from previous steps)
- Time expenditure tables (in the cloud)
nuggets
The nuggets that can be used to create the schedule are:
Startup file
Password: aufladendownloads
Softwares
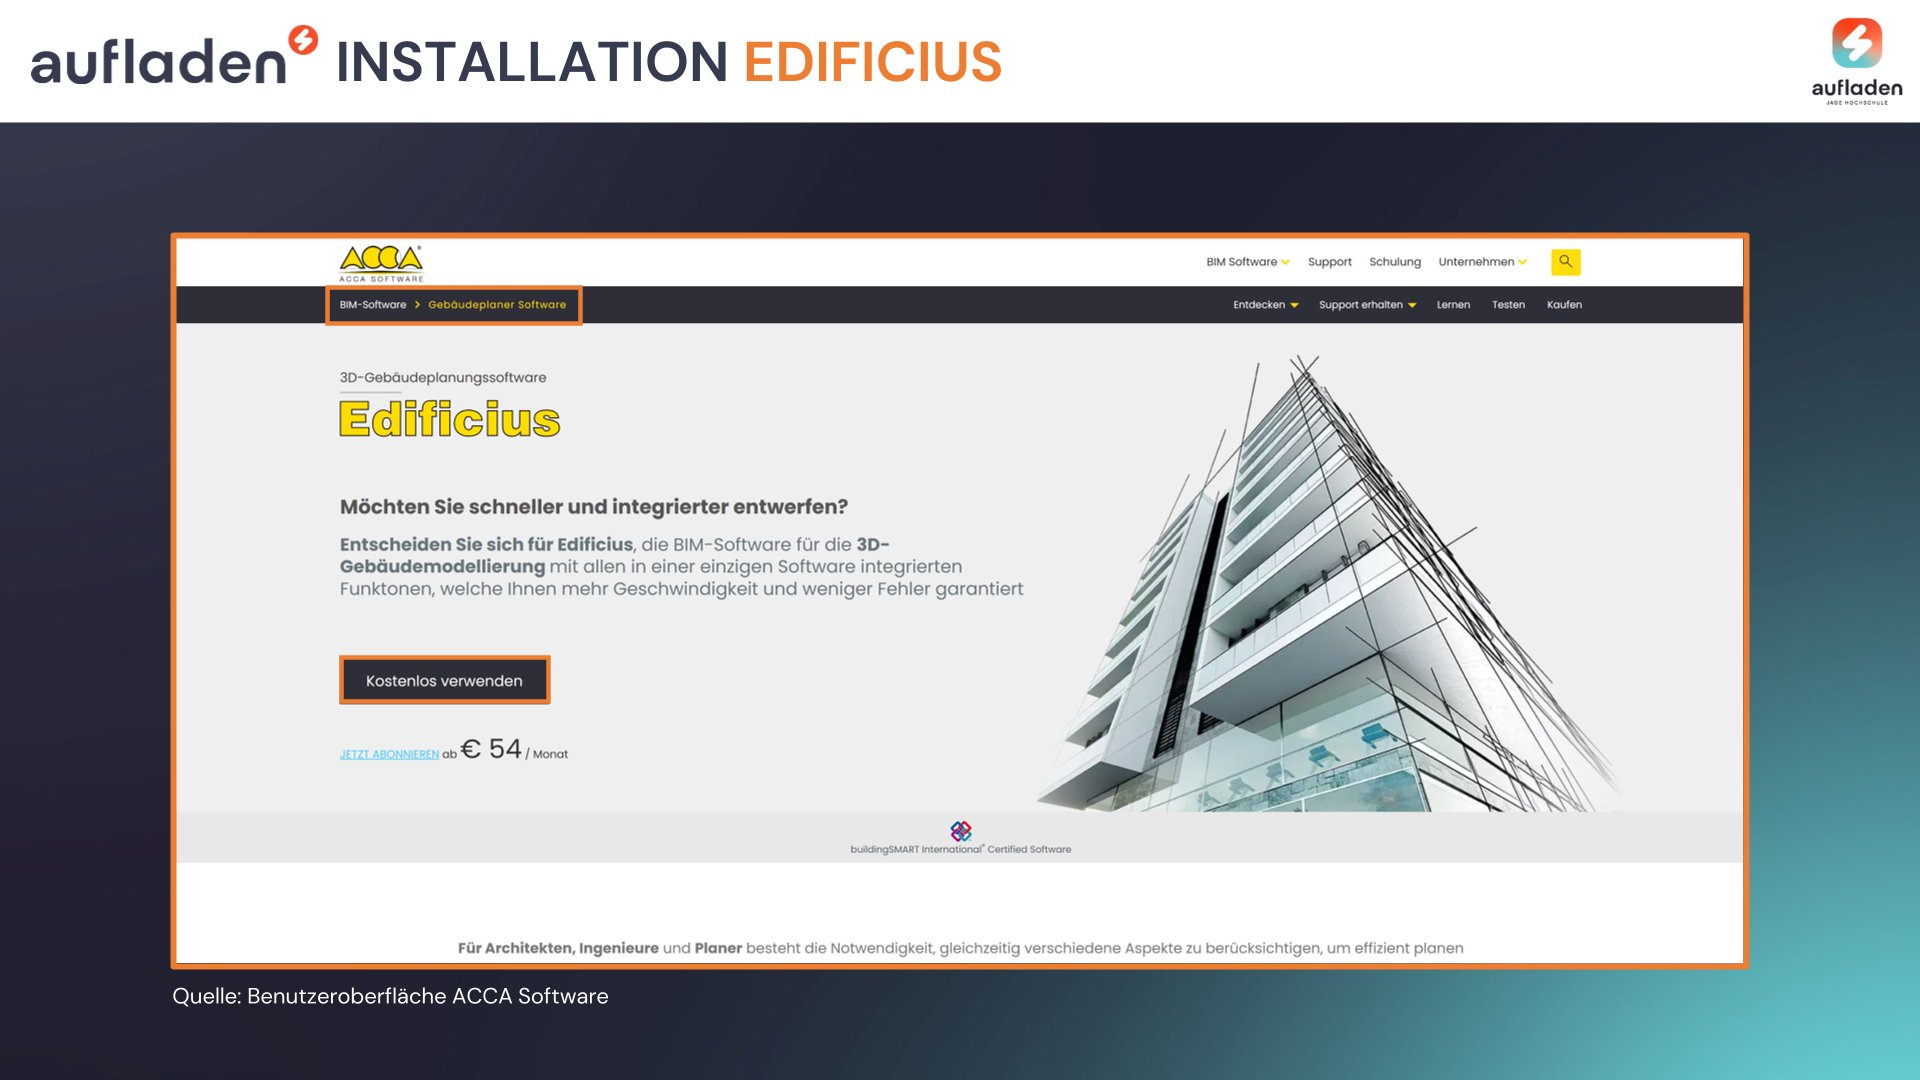
Installing Edificius:
- Open your web browser and go to ACCA Software's official website: www.accasoftware.com/en/trial/Edificius
- On the website, you'll find the option to download the trial version of Edificius or register as a student. Click on the appropriate download link.
- Follow the on-screen instructions to complete the download. Make sure you select the correct version for your operating system (Windows or macOS).
- Once the installation is complete, Edificius should be successfully installed on your computer.
- On your computer, find the Edificius program directory where the software was installed.
- Navigate to the directory and search for the “Edificius v.USbim (k)” application.
- Double click on the “Edificius v.USBIM (k)” icon or executable file to start the application.
- After starting Edificius v.USBIM (k), you can start scheduling in Edificius
Create an appointment
Learn the user interface Know about Edificius:
Change in the interface to the 4D Gantt mode:
Create the Scheduling based on the IFC file:
Exemplary time required is available as a PDF under the download button
Password: recharge downloads
ATTENTION! This step is only possible and necessary with access to the CDE. You can get access on request from the CHARGING team.
Visualization in architecture
The visualizer, also as User Visualizer [UV] , is responsible for using the BIM model to produce realistic and appealing visualizations to increase visual communication between all project participants.
The area of visualization is an important discipline in the BIM process, which is responsible for creating compelling and realistic visualizations from a BIM model. It improves visual communication and understanding between project participants and helps to improve the quality of final planning and design.
task
Using the previously created 3D model (TUE-06), a rendering of the object is to be created in a fictional environment.
- Installing the software that is to be used.
- Create a new project and import the FBX file.
- Allocation of materials
- Generate the environment & place assets
- Camera position and adjustment
- Exporting the rendering
nuggets
The nuggets that can be used to create the rendering are:
softwares
For implementation, the programs will Twinmotion and/or Lumion used. Both programs are professional software solutions for creating high-quality visualizations and renderings of architectural projects. They usually come with a fee but offer free trials.
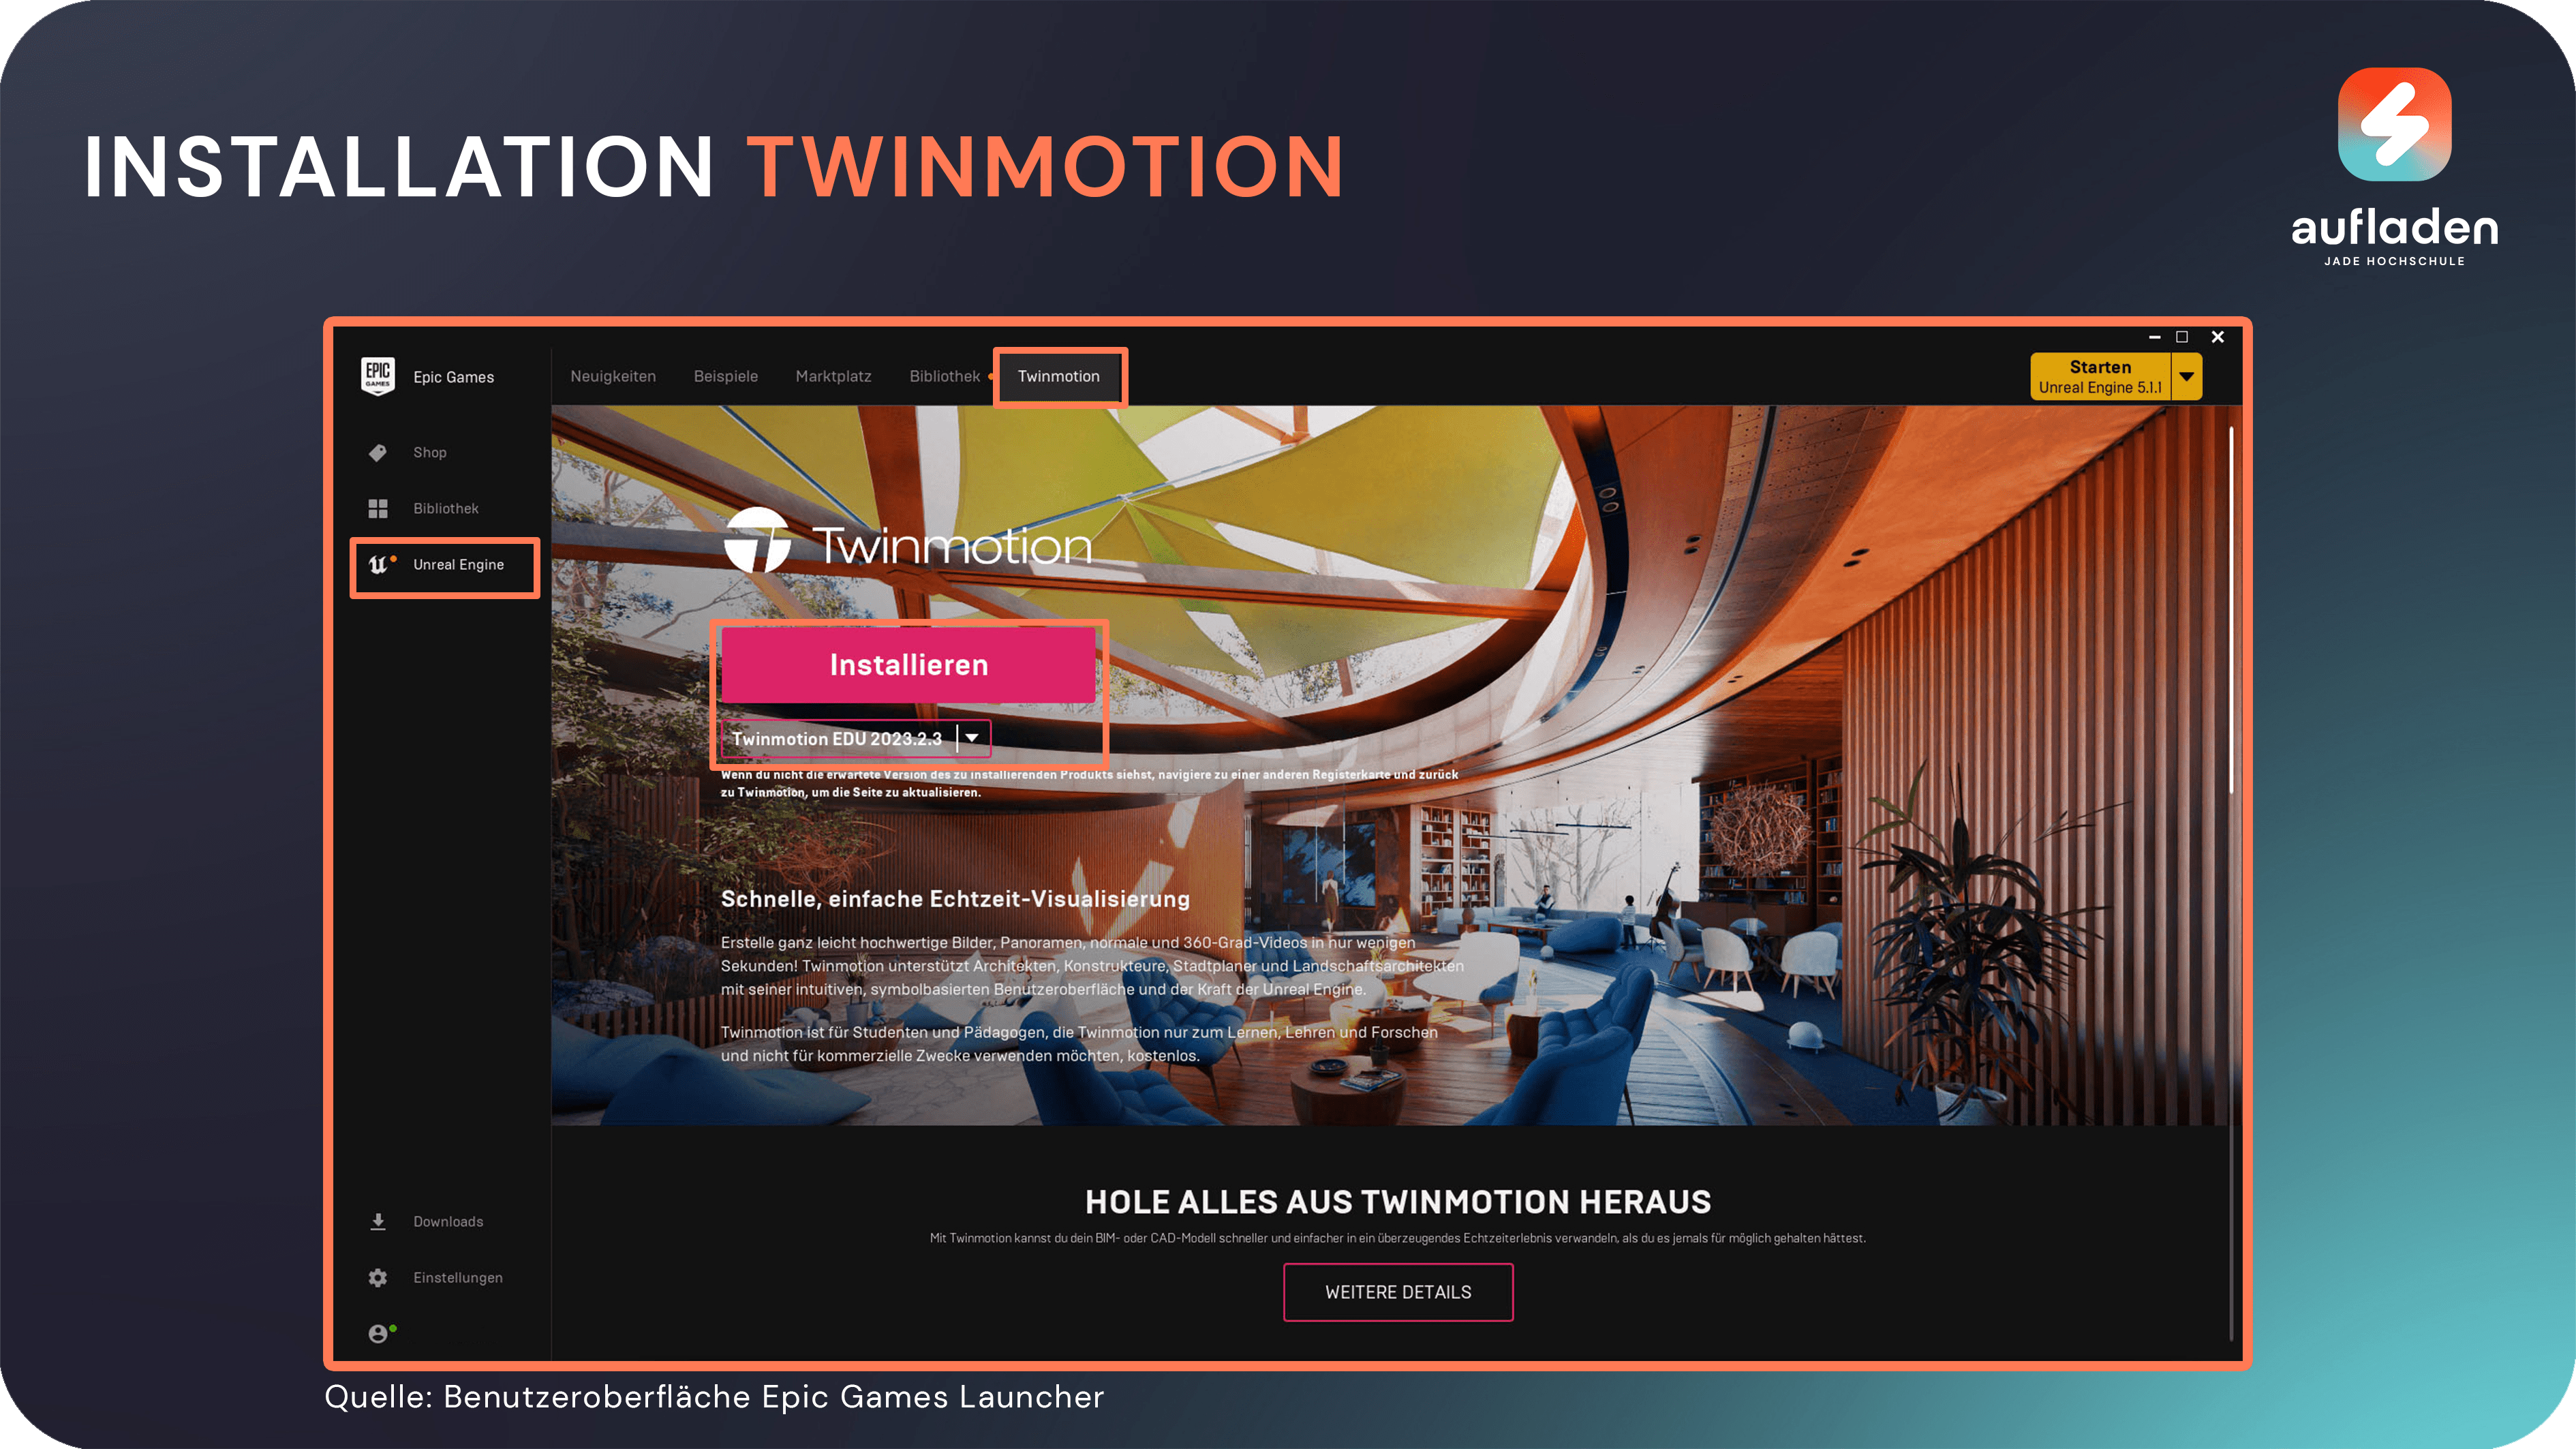
Installing Twinmotion
The following steps are required to install Twinmotion:
- Download & install the application Epic Games Launcher under https://store.epicgames.com/de/download
- Subsequent start and set up a user account if one does not exist.
- In the launcher under the tab Unreal Engine the rider Twinmotion select.
- There version Twinmotion EDU 2023.2.3 (as of April 2024) and click installation click
- After successful installation, Twinmotion can be used at library in Epic Games Launcher or via the desktop shortcut be launched.
Installing Lumion
To install the version of Lumion for students The following steps are necessary:
- Open link and go down to the bottom End of page scroll. https://www.lumion3d.de/studenten
- Under Lumion order form Provide all necessary information. As proof, a valid certificate of enrollment be uploaded.
- Then comes via the specified email one License key and activation code with installation instructions.
- After successful installation, Lumion can be started.

First steps for the BIM user [UV]
In the next chapter, a new project is created for the respective software and the building model is linked. To do so, click on”widthr”.
Create a new project and connect FBX
At the beginning, a new project is created in Twinmotion. Here we use the provided FBX file, which can be downloaded using the download button below.
The password for this is: recharge downloads
Once the project has been created, the FBX is linked.
All information about importing the FBX can be found in the videos below or in the Nuggets's on Lumion & Twinmotion
Importing geometry with Twinmotion
Importing geometry with Lumion
Vitality through material
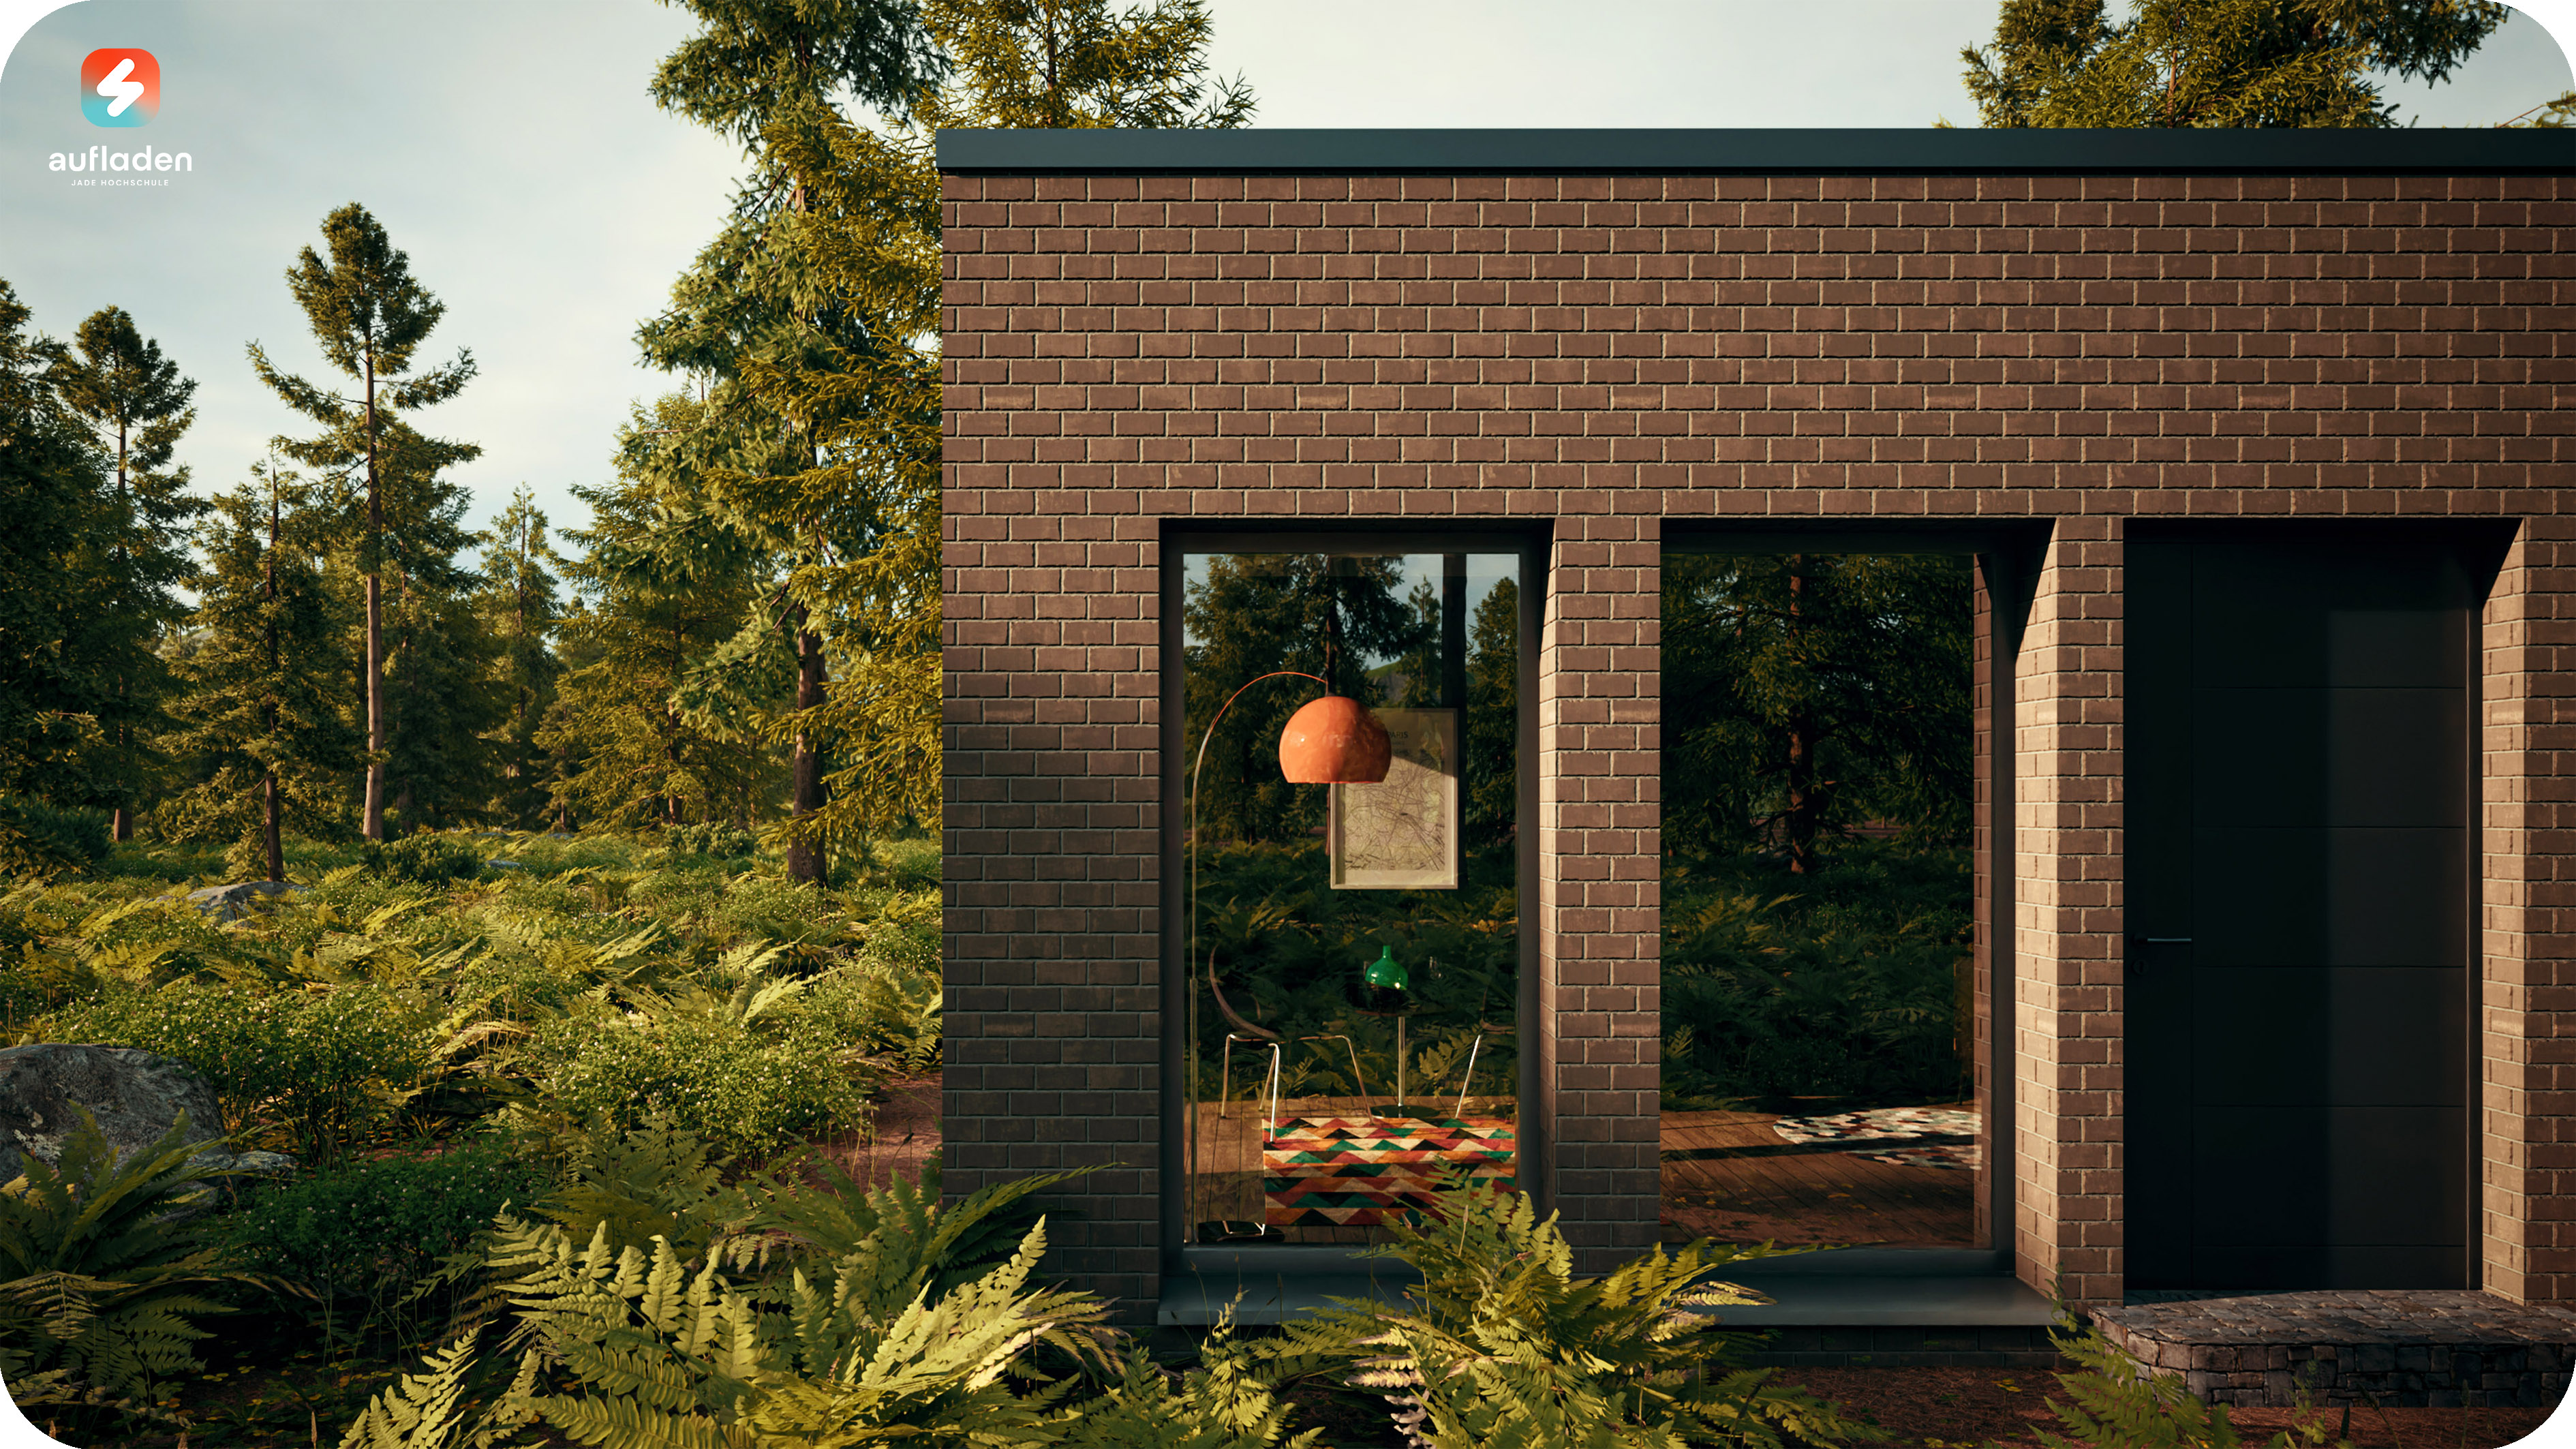
Materials play a central role in the visual presentation of architectural projects. They add texture, color and realism to the virtual models, and enable viewers to get a vivid picture of the planned buildings or interiors. When awarding materials to create a rendering, there are several aspects to consider, including aesthetics, functionality, and emotional impact.
task
Before moving on to designing the environment and placing assets, the building and the ground are given the appropriate materials.
This requires the following steps:
- Allocation of all materials for the building model.
- Allocation of the material for the soil base.
All information about the allocation of material can be found in the videos below or in the nuggets about Lumion & Twinmotion.
Material in Twinmotion
Material in Lumion
In the next chapter, the building and the environment are made more lively by selecting and placing self-selected assets.
Placing assets
Assets are important elements in creating architectural renderings because they enliven the scene, convey realism, and help viewers better empathize with the building or interior environment. Placing assets requires careful consideration of scaling, positioning, and selection to achieve a compelling and appealing visual presentation.
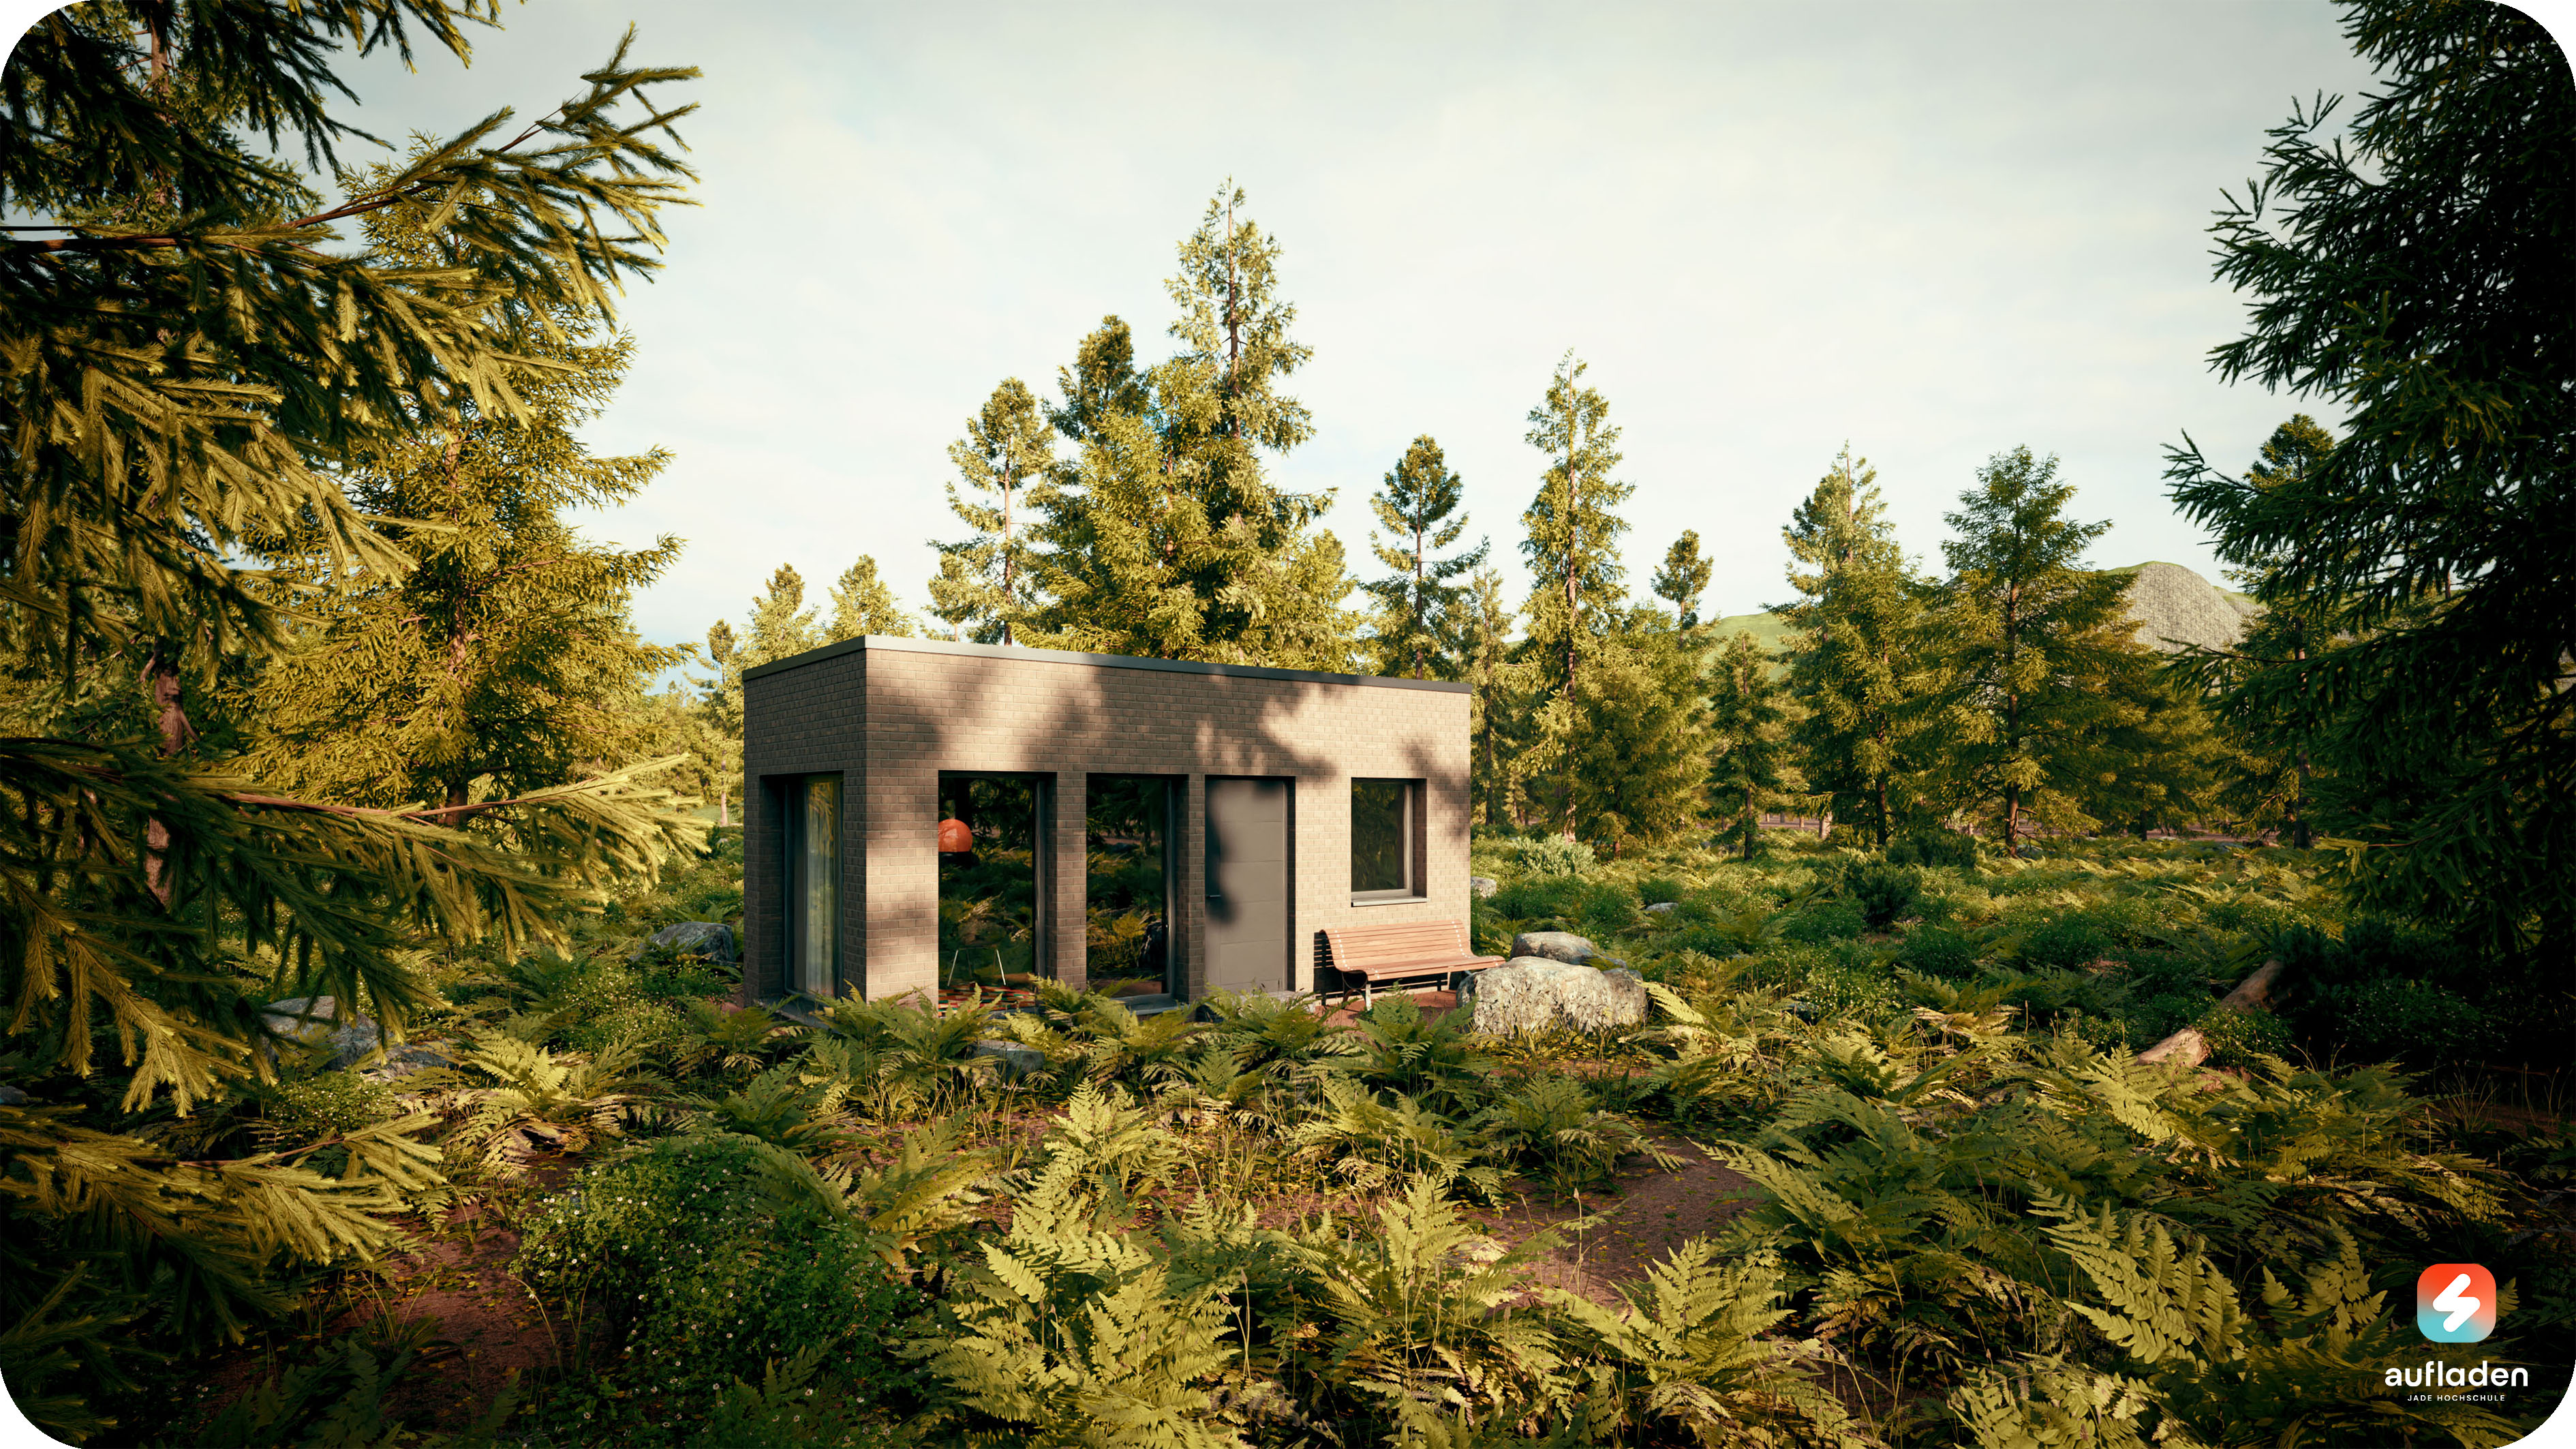
task
After the material has been defined and all necessary 3D objects have been textured, the environment should be supplemented by placing self-selected assets. For this purpose, we create a fictional environment in the form of a forest landscape in which our building stands.
The implementation can generally be described as follows:
- Open asset/object library.
- Select the required assets and place them accordingly.
- If necessary, scale and rotate assets to place them precisely.
All information about designing vegetation and placing assets can be found in the videos below or in the nuggets Lumion & Twinmotion.
Vegetation in Twinmotion
Street View & Surrounding Areas in Lumion
Create objects in Lumion
The last chapter is about setting the camera and making the necessary default settings for the subsequent export of the rendering.
Perspective as a deciding element
Perspective is a crucial element when creating architectural renderings, as it allows viewers to experience and understand the planned building or space from different angles. The camera setting plays a central role in achieving the desired perspective and optimally highlighting the architectural qualities of the design.

task
In the last part, after allocating all materials and designing the environment, the desired perspective for exporting the renderings should be created.
All information about camera settings & export can be found in the videos below or in the nuggets about Lumion & Twinmotion
Scene & Render setting in Twinmotion
Scene & Render Setting in Lumion
ATTENTION! This step is only possible and necessary with access to the CDE. You can get access on request from the CHARGING team.
2
tasks
3
downloads
2